Showing posts with label entity. Show all posts

1/6/15

Add Data Annotations to Entity Framework Models with Metadata or Buddy Classes

When using code generation (ORM), the model classes are automatically created by the tools.  We usually try to edit the class and add annotations such as field requirements, formatting and messages. The problem with this approach is that when we need to add properties to the model class, we will need to re-generate the class and all the data annotations will be wiped out which create extra work for us.

A quick way to address this challenge is to create a Metadata or Buddy class that provides all the annotations that we need. We can then add an attribute to a partial class with the same name as the class that was generated to indicate that there is another class that provides the annotations on its behalf.   We can now take a look at an ASP.NET MVC project which can be loaded from the source code link at the end of this article.

Class Generated by Entity Framework (Database first approach)

We first create a simple table with the following definition:

CREATE TABLE [dbo].[Car] (
    [Id]    INT           IDENTITY (1, 1) NOT NULL,
    [Make]  NVARCHAR (50) NOT NULL,
    [Model] NVARCHAR (50) NOT NULL,
    [Trim]  NVARCHAR (50) NULL,
    PRIMARY KEY CLUSTERED ([Id] ASC)
)

Note: This table is created using the .mdf files under the app_data folder.

We now can use EF by adding an ADO.Net Entity Data Model to create the model from our database which generates the following definition (see Models/car.edmx file). Do not forget to compile after the table has been imported.


namespace og.samples.aspnet.MetaDataClass.Models
{   
    public partial class Car
    {
        public int Id { get; set; }
        public string Make { get; set; }
        public string Model { get; set; }
        public string Trim { get; set; }        
    }
}


As we can see, there are no annotations on this model. Since this is a generated class, we would like to add our annotation class instead of changing it. We need to do this before we generate the views.

New Partial and Metadata Classes

The steps to add our metadata class are the followings:

1)      Add a new class under the model folder
a.      Name it  car.metadata.cs
2)      Create another class that contains all the data annotations.
a.      This is not a partial class
b.      This is a sealed class as there is no need to instantiate it
3)      Add a new partial class with the same name as the ORM class
a.      Add the [MetadataType] attribute to the class that was just created
b.      Set the type to the class that has the annotations.
4)      Compile

The code should now look as follows:

namespace og.samples.aspnet.MetaDataClass.Models
{
    /// <summary>
    /// partial class definition to associate the ORM generated class
    /// NO NEED to add the properties here.
    /// </summary>
    [MetadataType(typeof(CarAnnotation))]
    public partial class Car
    {
    }

    /// <summary>
    /// Buddy Class or Data Annotation Class
    /// Add the properties here with the associated annotations
    /// </summary>
    internal sealed class CarAnnotation
    {
        [Required(ErrorMessage="{0} is required")]
        [MinLength(3,ErrorMessage="{0} should have three or more letters")]   //kia
        public string Make { get; set; }

        [Required(ErrorMessage = "{0} is required")]
        [MinLength(5)]
        public string Model { get; set; }
    }
}
We are making Make and Model required. In addition, we are making the Make to have a minimum of three characters.

Create Controller and Views

We now just need to add our controller and views by adding a controller item under the controller folders and selecting the following properties:
  1. MVC 5 with controller with views, using Entity framework
  2. Enter the following settings and compile the project


 Cars Create View (see sample project)

Run the application and select Run Demo under the Metadata classes section.


This is how the view should look. Press Create for the validation to take place as shown below.


With the above view, we can show that our data annotation validations are shown when the user does not meet the input requirements.

Conclusion

With this approach we can show that we can still enable the use of ORM tools to generate the models and continue to support our application specific data annotation requirements without the concern of losing any information.

Code Sample

Available at:  GitHub  (see Dev Branch for latest changes)

Thanks.

10/4/12

Database First Development with ASP.NET MVC Scaffolding and Entity Framework

With ASP.NET MVC and Scaffolding, we are able to code first and create the database objects from the model. This approach basically allows us to create the model classes (implementation). We can then use Scaffolding to create the controller, view and database objects with code generation.  This however is not as straight forward when we use the Database first approach in which we design our database first and then we want to create the controller and view. We are going to walk through this scenario to see how we can achieve this with Scaffolding and the Entity Framework.

Database Model:

We first start by creating our database object model.  Create a database on SQL Server and add the following table and a few records:

CREATE TABLE [dbo].[VehicleMake](
      [MakeId] [int] IDENTITY(1,1) NOT NULL,
      [Name] [varchar](50) NOT NULL,
      [Description] [varchar](500) NULL,
 CONSTRAINT [PK_VehicleMake] PRIMARY KEY CLUSTERED
(
      [MakeId] ASC
)
) ON [PRIMARY]


--SQL SERVER 2008 SYNTAX
insert into [VehicleMake](Name,[Description])
values ('Ford','Ford Motor'),
       ('Nissan','Nissan Motor'),
        ('Toyota','Toyota USA')

This is the table that we will use for our application. We will create the entity model, controller and views without writing a line of code.

Entity Model:

Open Visual Studio 2010 and create an MVC project with these options:
  • ASP.NET MVC 4 Web Application
  • Template: Internet Application
  • View Engine: Razor

Now that we have our project created, we need to add the database entity model first. This is basically the concept of Database first development. Add the entity model from the database by following these steps:
  • Right click the Models folder and select Add New Item
  • On the right, select Data and click on ADO.NET Entity Data Model.  Enter VehicleModel in the name field
  • Select Generate from database
  • Select the database connection string or create a new connection to make sure you can connect to your database and select your database name
  • Select the table that we created before and click finish

Convert Entity from ObjectContext to DbContext:

This has created the Entity model, and we should be able to see the object diagram with the one class.  If we inspect the designer class under the edmx file (solution explorer), we can see that the Entities class inherits from ObjectContext. This causes a problem for Scaffolding because it needs a context object of type DbContext.   We will make this change with the following steps:
  • Right click on the edmx class diagram and select Add Code Generation
  • Click on Code and select EF DbContext Generator. If you do not see this option, click on Online Templates and install the template by selecting Entity 4 or 5  DbContext Generator. This is determined by the version of the Entity framework you have installed.

We just replaced the code in the edmx designer class with code generated in tt files. You should have two files one with ModelContext.tt and Model.tt.  The TT extension stands for Text Template. This is the T4 technology that allows us to generate code using templatesa, and this is not just for MVC projects.  The model context file contains the database context class of type DbContext.  The model tt file contains the entity model for the table.

public partial class CommerceEntities : DbContext
    {
        public CommerceEntities()
            : base("name=CommerceEntities")
        {
        }
   
        protected override void OnModelCreating(DbModelBuilder modelBuilder)
        {
            throw new UnintentionalCodeFirstException();
        }
   
        public DbSet<VehicleMake> VehicleMakes { get; set; }
    }

public partial class VehicleMake
    {
        public int MakeId { get; set; }
        public string Name { get; set; }
        public string Description { get; set; }
    }

Scaffolding Controller and View:

We are now ready to start creating our controller and view. Let’s start by installing the Scaffolding package to our project by following these steps:
  • On Visual Studio, select tools->Library Package Manager->Package Manager Console
  • At the PM> prompt, type this command:  INSTALL-PACKAGE MVCSCAFFOLDING

That should install the T4 templates for code generation and the MVCScaffolding reference to our project.  Let’s now create our vehicle make controller and view by typing this command at the PM> prompt:
  • Scaffold Controller VehicleMake  -force -repository -DbContextType "CommerceEntities"

In this command, we are telling our code generation to create a controller and view based on the VehicleMake model. The –force switch is used to overwrite any previous files. The –repository switch is to create a repository interface that would be used by the controller. This facilitates for a dependency injection approach which avoids having a tightly couple implementation of the entity object in the controller. The –DbContextType is to tell our code generation that when the repository class is created it should use the DbContextType that was created when we converted the entity classes to type DbContext. In our case, it is the CommerceEntities. If this parameter is not used, the code will be generated with a type of MVCContext which is not our entity context.

The output for this command should look like this:

PM> scaffold controller VehicleMake -force -repository -DbContextType "CommerceEntities"
Scaffolding VehicleMakesController...
CommerceEntities already has a member called 'VehicleMakes'. Skipping...
Added repository 'Models\VehicleMakeRepository.cs'
Added controller Controllers\VehicleMakesController.cs
Added Create view at 'Views\VehicleMakes\Create.cshtml'
Added Edit view at 'Views\VehicleMakes\Edit.cshtml'
Added Delete view at 'Views\VehicleMakes\Delete.cshtml'
Added Details view at 'Views\VehicleMakes\Details.cshtml'
Added Index view at 'Views\VehicleMakes\Index.cshtml'
Added _CreateOrEdit view at 'Views\VehicleMakes\_CreateOrEdit.cshtml'

*Note: If you get this error:

Get-PrimaryKey : Cannot find primary key property for type 'demo.Models.VehicleMake'. No properties appear
 to be primary keys

Check your model class and make sure the primary key field is annotated accordingly by adding the [Key] attribute and the System.ComponentModel.DataAnnotation namespace. The model class should look like this:
using System.ComponentModel.DataAnnotations;
   
    public partial class VehicleMake
    {
        [Key]
        public int MakeId { get; set; }
        public string Name { get; set; }
        public string Description { get; set; }
    }

In our code, we should now have all the files listed in the output of the package manager console.  The repository file should have this code: (notice the context object is of type CommerceEntities)

public class VehicleMakeRepository : IVehicleMakeRepository
    {
        CommerceEntities context = new CommerceEntities();

        public IQueryable<VehicleMake> All
        {
            get { return context.VehicleMakes; }
        }

The controller file should look as follows: 

public class VehicleMakesController : Controller
    {
       private readonly IVehicleMakeRepository vehiclemakeRepository;

       // If you are using Dependency Injection, you can delete the following constructor
        public VehicleMakesController() : this(new VehicleMakeRepository())
        {
        }

        public VehicleMakesController(IVehicleMakeRepository vehiclemakeRepository)
        {
                    this.vehiclemakeRepository = vehiclemakeRepository;
        }

You should notice how the controller uses the repository interface as the parameter in the constructor. This allows us to use dependency injection and separate the model operations from the controller. The controller uses the repository for all the data/model tasks.

For the views, we have the index, edit, create, delete and details views which can be used for the CRUD operations. These views and controller can be enhanced to meet your application requirements.

Run the project:

We can now compile the project and run it. The application should load in the browser and display the home page. We can type the controller name on the url to something like: (add the port number when using Visual Studio)


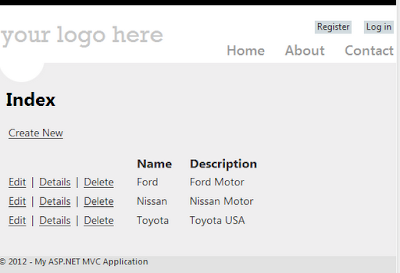
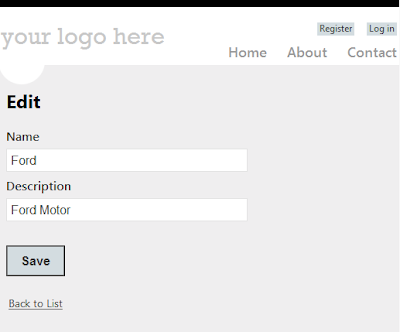
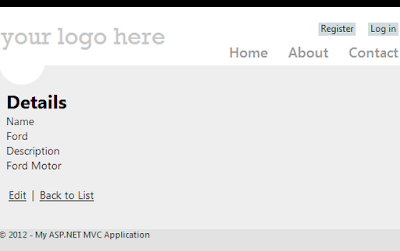
This should load the following views:

Index View

Edit View

Details View

These views may not have a great design, but the objective here was to show how we can create a running application with no implementation effort at the application level.  We can see the records that were added during our database creation step. From these views, we should be able to add, edit and delete records, and the changes will be reflected in our table.

I hope I was able to show you how to leverage Scaffolding and the Entity framework to accelerate your development process. We started with a database model, use some code generation templates and created a simple application in a short time. 

10/3/12

Unable to load the specified metadata resource

Exception Description:


Exception Details: System.Data.MetadataException: Unable to load the specified metadata resource.

Resolution:


This error is often generated when we are using the Entity Framework for database access. The error means that there is a problem with finding the metadata information to allow the Entity Framework to work properly and translate queries against the conceptual model. At design time, the database entity model is created in the .edmx file. After compilation, the metadata information is stored as a resource in three different files:
  • .csdl  Conceptual Schema Definition Language
  • .ssdl  Store Schema Definition Language
  • .msl Mapping Specification Language
By default, these files get generated and embedded as a resource on the assembly. To find the location of these files, the Entity Framework uses the entities connection string in the config file. If you take a look at a config file, we will find this setting:

<connectionStrings>
    <add name="GalleryEntities" connectionString="metadata=res://*/Gallery.csdl|
res://*/Gallery.ssdl|
res://*/Gallery.msl;
provider=System.Data.SqlClient;provider connection string=&quot;data source=localhost\sqlexpress;initial catalog=…;App=EntityFramework&quot;" providerName="System.Data.EntityClient" />
  </connectionStrings>

For this project, we can see that the connection string indicates that all the files should be found on the default assembly’s (*) resources, and their names match the Gallery.* pattern. We are getting an error, so there is something not matching here. We will need to compile the code and inspect the assembly using reflector or ilspy.  These applications let us decompile assemblies, so we can browse their content. After opening the assembly, look at the resources folder, we should see the files there. In my case, there was a problem with the way the files get generated. The actual name of the files is Models.Gallery.*.  If you correct those entries in the config file, the connection string should now read as follows:

<connectionStrings>
    <add name="GalleryEntities" connectionString="metadata=res://*/Models.Gallery.csdl|
res://*/Models.Gallery.ssdl|
res://*/Gallery.msl;
provider=System.Data.SqlClient;provider connection string=&quot;data source=localhost\sqlexpress;initial catalog=…;App=EntityFramework&quot;" providerName="System.Data.EntityClient" />
  </connectionStrings>

We can now run the application, and the data should load with no problems.  If this was not the problem for your project, you should also make sure in which assembly the resource files are located. If it is not in the default assembly, you should replace the * in the connection string with the name of the correct assembly. For example:

connectionString="metadata=res://myassembly.dll/Models.Gallery.csdl|
res://myassembly.dll /Models.Gallery.ssdl|
res://myassembly.dll /Gallery.msl;

That indicates that those files are embedded as a resource in a different dll. I hope this provides some help in resolving this metadata exception.


9/8/12

What is the difference between ObjectSet and EntityCollection?


When working with the Entity framework, you may see that there are two types of collection created, ObjectSet and EntityCollection. Many of us get a bit confused as of why there are two types of collections and about their use. I will try to describe my understanding of their differences:

ObjectSet Definition from MSDN:

public class ObjectSet<TEntity> : ObjectQuery<TEntity>,
        IObjectSet<TEntity>, IQueryable<TEntity>, IEnumerable<TEntity>,
        IQueryable, IEnumerable 
where TEntity : class

ObjectSet provides access to entities/tables of a database.  ObjectSet is IQueryable which means that when you use this reference with a LINQ query, the expression is changed to the SQL expression for the provider (i.e. Entity classes mapping to SQL Server). This is how LINQ works for the LINQ to Entities expressions to be able to select records from the database.

EntityCollection Definition from MSDN:

public sealed class EntityCollection<TEntity> : RelatedEnd, 
        ICollection<TEntity>, IEnumerable<TEntity>, IEnumerable, IListSource 
where TEntity : class

EntityCollection is a collection type which represents “many” entities. When we use LINQ to query an EntityCollection, we are using LINQ to Objects to retrieve the “in-memory” objects in the collection, and no query is executed in the database.  The records for this collection are the ones associated to a main entity as a property and are loaded using the Load method which uses an ObjectSet to load the records from the database. Look at this pseudocode:

VehicleMake: IQueryable{                //represents the ObjectSet
        VehicleModels:IEnumerable      //represents an EntityCollection populated by Load()
}

VehicleModels:IQueryable{// ObjectSet which gets the records from the database
}

When the collection is a property is an EntityCollection.

I hope this is able to help some of you.