Showing posts with label github. Show all posts

8/21/24

Medallion Architecture: A Blueprint for Data Insights and Governance - Data Engineering Process Fundamentals

Overview

Gain understanding of Medallion Architecture and its application in modern data engineering. Learn how to optimize data pipelines, improve data quality, and unlock valuable insights. Discover practical steps to implement Medallion principles in your organization and drive data-driven decision-making.
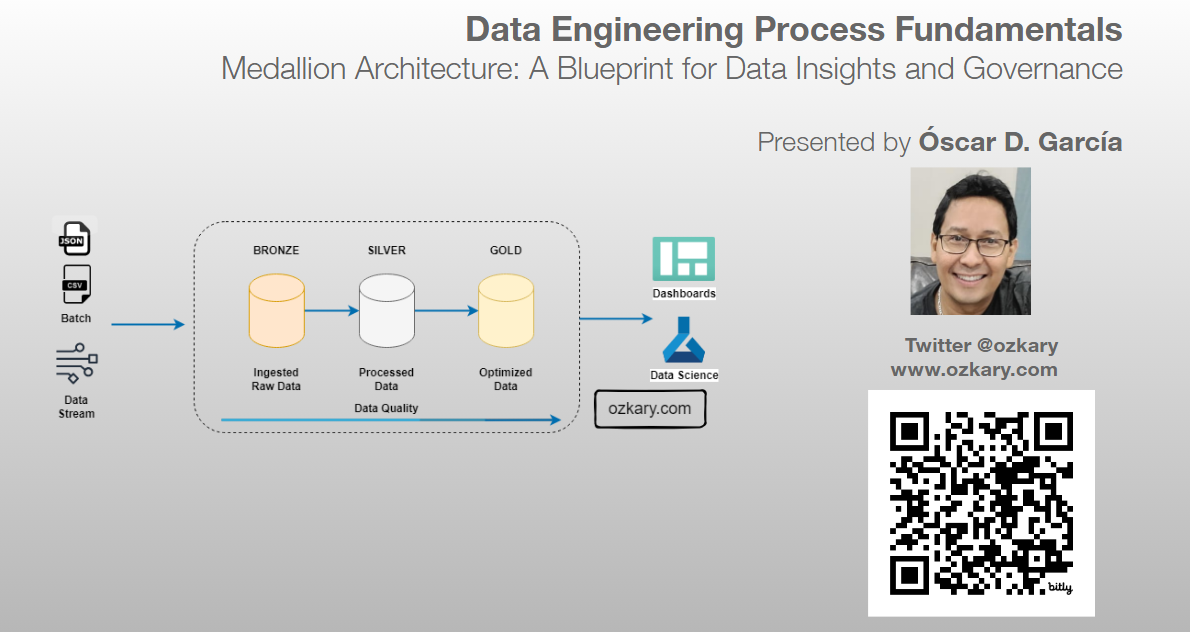
Data Engineering Process Fundamentals - Medallion Architecture

  • Follow this GitHub repo during the presentation: (Give it a star)

👉 https://github.com/ozkary/data-engineering-mta-turnstile

  • Read more information on my blog at:

👉 https://www.ozkary.com/2023/03/data-engineering-process-fundamentals.html

YouTube Video

Video Agenda

  • Introduction to Medallion Architecture

    • Defining Medallion Architecture
    • Core Principles
    • Benefits of Medallion Architecture
  • The Raw Zone

    • Understanding the purpose of the Raw Zone
    • Best practices for data ingestion and storage
  • The Bronze Zone

    • Data transformation and cleansing
    • Creating a foundation for analysis
  • The Silver Zone

    • Data optimization and summarization
    • Preparing data for consumption
  • The Gold Zone

    • Curated data for insights and action
    • Enabling self-service analytics
  • Empowering Insights

    • Data-driven decision-making
    • Accelerated Insights
  • Data Governance

    • Importance of data governance in Medallion Architecture
    • Implementing data ownership and stewardship
    • Ensuring data quality and security

Why Attend:

Gain a deep understanding of Medallion Architecture and its application in modern data engineering. Learn how to optimize data pipelines, improve data quality, and unlock valuable insights. Discover practical steps to implement Medallion principles in your organization and drive data-driven decision-making.

Presentation

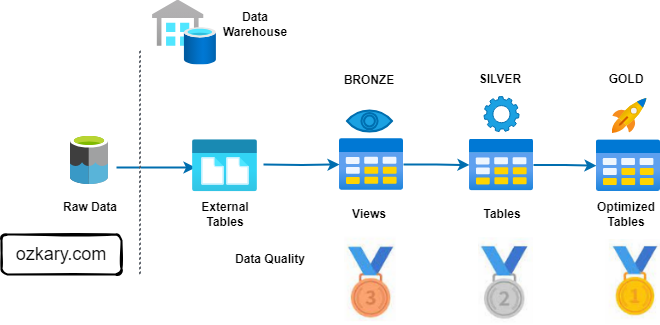
Introducing Medallion Architecture

Medallion architecture is a data management approach that organizes data into distinct layers based on its quality and processing level.

  • Improved Data Quality: By separating data into different zones, you can focus on data quality at each stage.
  • Enhanced Data Governance: Clear data ownership and lineage improve data trustworthiness.
  • Accelerated Insights: Optimized data in the Silver and Gold zones enables faster query performance.
  • Scalability: The layered approach can accommodate growing data volumes and complexity.
  • Cost Efficiency: Optimized data storage and processing can reduce costs.

Data Engineering Process Fundamentals - Medallion Architecture Design Diagram

The Raw Zone: Foundation of Your Data Lake

The Raw Zone is the initial landing place for raw, unprocessed data. It serves as a historical archive of your data sources.

  • Key Characteristics:
    • Unstructured or semi-structured format (e.g., CSV, JSON, Parquet)
    • Data is ingested as-is, without any cleaning or transformation
    • High volume and velocity
    • Data retention policies are crucial
  • Benefits:
    • Preserves original data for potential future analysis
    • Enables data reprocessing
    • Supports data lineage and auditability
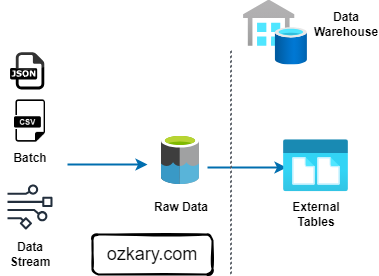
Data Engineering Process Fundamentals - Medallion Architecture Raw Zone Diagram

Use case Background

The Metropolitan Transportation Authority (MTA) subway system in New York has stations around the city. All the stations are equipped with turnstiles or gates which tracks as each person enters (departure) or exits (arrival) the station.

  • The MTA subway system has stations around the city.
  • All the stations are equipped with turnstiles or gates which tracks as each person enters or leaves the station.
  • CSV files provide information about the amount of commuters per stations at different time slots.

Data Engineering Process Fundamentals - Data streaming MTA Gates

Problem Statement

In the city of New York, commuters use the Metropolitan Transportation Authority (MTA) subway system for transportation. There are millions of people that use this system every day; therefore, businesses around the subway stations would like to be able to use Geofencing advertisement to target those commuters or possible consumers and attract them to their business locations at peak hours of the day.

  • Geofencing is a location based technology service in which mobile devices’ electronic signal is tracked as it enters or leaves a virtual boundary (geo-fence) on a geographical location. Businesses around those locations would like to use this technology to increase their sales.
  • Businesses around those locations would like to use this technology to increase their sales by pushing ads to potential customers at specific times.

ozkary-data-engineering-mta-geo-fence

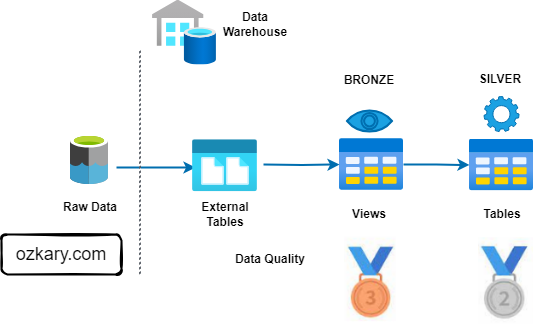
The Bronze Zone: Transforming Raw Data

The Bronze Zone is where raw data undergoes initial cleaning, structuring, and transformation. It serves as a staging area for data before moving to the Silver Zone.

  • Key Characteristics:
    • Data is cleansed and standardized
    • Basic transformations are applied (e.g., data type conversions, null handling)
    • Data is structured into tables or views
    • Data quality checks are implemented
    • Data retention policies may be shorter than the Raw Zone
  • Benefits:
    • Improves data quality and consistency
    • Provides a foundation for further analysis
    • Enables data exploration and discovery
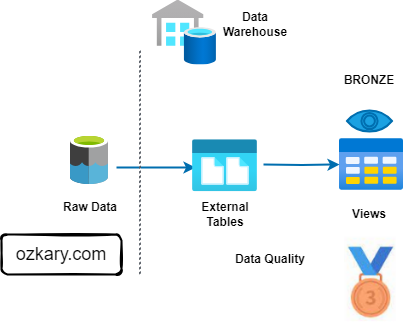
Data Engineering Process Fundamentals - Medallion Architecture Bronze Zone Diagram

The Silver Zone: A Foundation for Insights

The Silver Zone houses data that has been further refined, aggregated, and optimized for specific use cases. It serves as a bridge between the raw data and the final curated datasets.

  • Key Characteristics:
    • Data is cleansed, standardized, and enriched
    • Data is structured for analytical purposes (e.g., normalized, de-normalized)
    • Data is optimized for query performance (e.g., partitioning, indexing)
    • Data is aggregated and summarized for specific use cases
  • Benefits:
    • Improved query performance
    • Supports self-service analytics
    • Enables advanced analytics and machine learning
    • Reduces query costs

Data Engineering Process Fundamentals - Medallion Architecture Silver Zone Diagram

The Gold Zone: Your Data's Final Destination

  • Definition: The Gold Zone contains the final, curated datasets ready for consumption by business users and applications. It is the pinnacle of data transformation and optimization.
  • Key Characteristics:
    • Data is highly refined, aggregated, and optimized for specific use cases
    • Data is often materialized for performance
    • Data is subject to rigorous quality checks and validation
    • Data is secured and governed
  • Benefits:
    • Enables rapid insights and decision-making
    • Supports self-service analytics and reporting
    • Provides a foundation for advanced analytics and machine learning
    • Reduces query latency

Data Engineering Process Fundamentals - Medallion Architecture Gold Zone Diagram

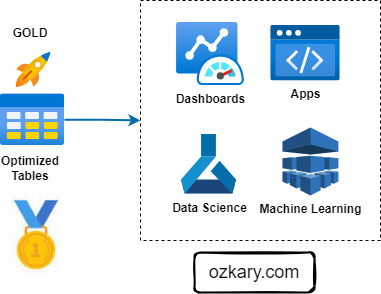
The Gold Zone: Empowering Insights and Actions

The Gold Zone is the final destination for data, providing a foundation for insights, analysis, and action. It houses curated, optimized datasets ready for consumption.

  • Key Characteristics:
    • Data is accessible and easily consumable
    • Supports various analytical tools and platforms (BI, ML, data science)
    • Enables self-service analytics
    • Drives business decisions and actions
  • Examples of Consumption Tools:
    • Business Intelligence (BI) tools (Looker, Tableau, Power BI)
    • Data science platforms (Python, R, SQL)
    • Machine learning platforms (TensorFlow, PyTorch)
    • Advanced analytics tools

Data Engineering Process Fundamentals - Medallion Architecture Analysis Diagram

Data Governance: The Cornerstone of Data Management

Data governance is the framework that defines how data is managed within an organization, while data management is the operational execution of those policies. Data Governance is essential for ensuring data quality, consistency, and security.

Key components of data governance include:

  • Data Lineage: Tracking data's journey from source to consumption.
  • Data Ownership: Defining who is responsible for data accuracy and usage.
  • Data Stewardship: Managing data on a day-to-day basis, ensuring quality and compliance.
  • Data Security: Protecting data from unauthorized access, use, disclosure, disruption, modification, or destruction.
  • Compliance: Adhering to industry regulations (e.g., GDPR, CCPA, HIPAA) and internal policies.

By establishing clear roles, responsibilities, and data lineage, organizations can build trust in their data, improve decision-making, and mitigate risks.
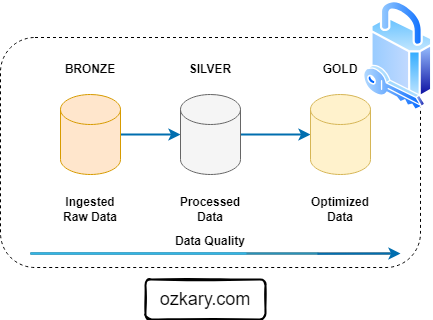
Data Engineering Process Fundamentals - Medallion Architecture Data Governance

Data Transformation and Incremental Strategy

The data transformation phase is a critical stage in a data warehouse project. This phase involves several key steps, including data extraction, cleaning, loading, data type casting, use of naming conventions, and implementing incremental loads to continuously insert the new information since the last update via batch processes.

Data Engineering Process Fundamentals - Data transformation lineage

Data Lineage: Tracks the flow of data from its origin to its destination, including all the intermediate processes and transformations that it undergoes.

Data Governance : Metadata

Assigns the owner, steward and responsibilities of the data.
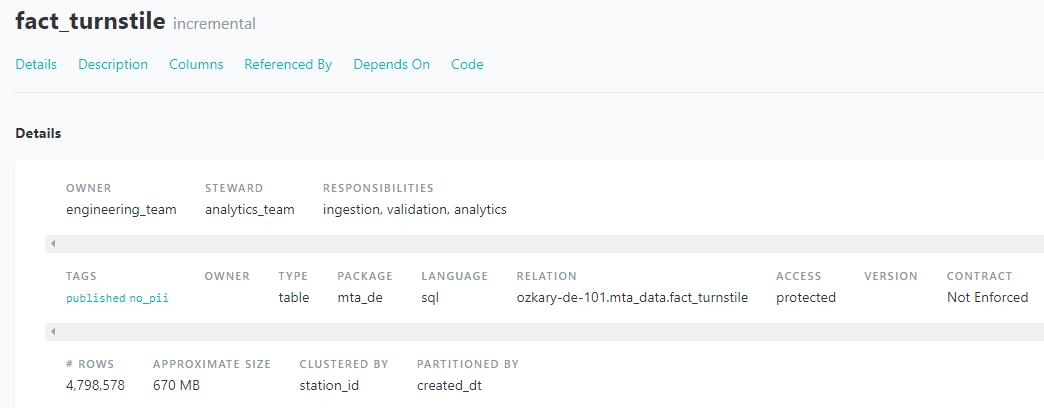
Data Engineering Process Fundamentals - Medallion Architecture Governance Metadata

Summary: Leverage Medallion Architecture for Success

  • Key Benefits:
    • Improved data quality
    • Enhanced governance
    • Accelerated insights
    • Scalability
    • Cost Efficiency.

Data Engineering Process Fundamentals - Medallion Architecture Diagram

We've covered a lot today, but this is just the beginning!

If you're interested in learning more about building cloud data pipelines, I encourage you to check out my book, 'Data Engineering Process Fundamentals,' part of the Data Engineering Process Fundamentals series. It provides in-depth explanations, code samples, and practical exercises to help in your learning.

Data Engineering Process Fundamentals - Book by Oscar Garcia Data Engineering Process Fundamentals - Book by Oscar Garcia

Thanks for reading.

Send question or comment at Twitter @ozkary 👍 Originally published by ozkary.com

4/24/24

Generative AI: Create Code from GitHub User Stories - Large Language Models

Overview

This presentation explores the potential of Generative AI, specifically Large Language Models (LLMs), for streamlining software development by generating code directly from user stories written in GitHub. We delve into benefits like increased developer productivity and discuss techniques like Prompt Engineering and user story writing for effective code generation. Utilizing Python and AI, we showcase a practical example of reading user stories, generating code, and updating the corresponding story in GitHub, demonstrating the power of AI in streamlining software development.

#BuildwithAI Series

Generative AI: Create Code from GitHub User Stories - LLM

  • Follow this GitHub repo during the presentation: (Give it a star and follow the project)

👉 https://github.com/ozkary/ai-engineering

  • Read more information on my blog at:

YouTube Video

Video Agenda

Agenda:

  • Introduction to LLMs and their Role in Code Generation
  • Prompt Engineering - Guiding the LLM
  • Writing User Stories for Code Generation
  • Introducing Gemini AI and AI Studio
  • Python Implementation - A Practical Example using VS Code
    • Reading user stories from GitHub.
    • Utilizing Gemini AI to generate code based on the user story.
    • Updating the corresponding GitHub user story with the generated code.
  • Conclusion: Summarize the key takeaways of the article, emphasizing the potential of Generative AI in code creation.

Why join this session?

  • Discover how Large Language Models (LLMs) can automate code generation, saving you valuable time and effort.
  • Learn how to craft effective prompts that guide LLMs to generate the code you need.
  • See how to write user stories that bridge the gap between human intent and AI-powered code creation.
  • Explore Gemini AI and AI Studio
  • Witness Code Generation in Action: Experience a live demonstration using VS Code, where user stories from GitHub are transformed into code with the help of Gemini AI.

Presentation

What are LLM Models - Not Skynet

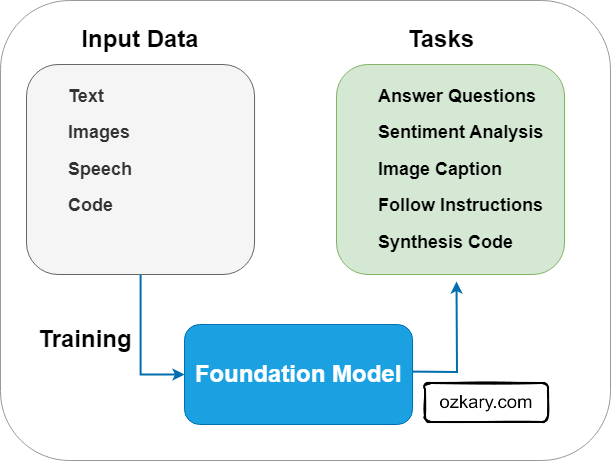
Large Language Model (LLM) refers to a class of Generative AI models that are designed to understand prompts and questions and generate human-like text based on large amounts of training data. LLMs are built upon Foundation Models which have a focus on language understanding.

Common Tasks

  • Text and Code Generation: LLMs can generate code snippets or even entire programs based on specific requirements

  • Natural Language Processing (NLP): Understand and generate human language, sentiment analysis, translation

  • Text Summarization: LLMs can condense lengthy pieces of text into concise summaries

  • Question Answering: LLMs can access and process information from various sources to answer questions, making a great fit for chatbots

Generative AI: Foundation Models

Training LLM Models - Secret Sauce

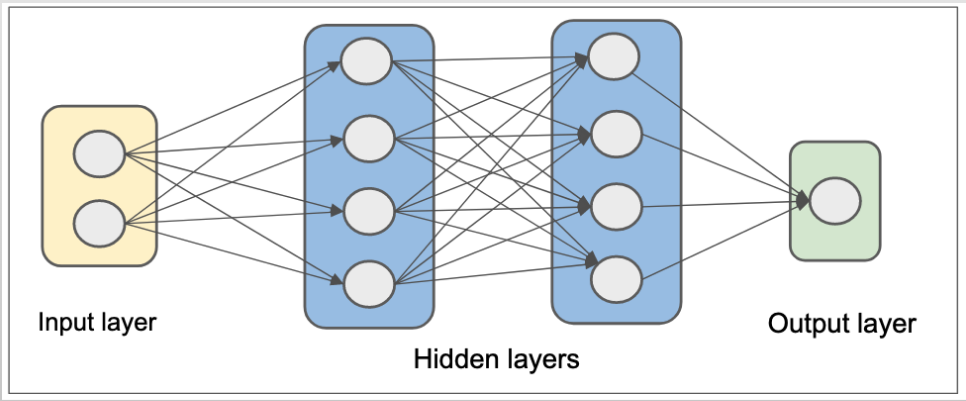
Models are trained using a combination of machine learning and deep learning. Massive datasets of text and code are collected, cleaned, and fed into complex neural networks with multiple layers. These networks iteratively learn by analyzing patterns in the data, allowing them to map inputs like user stories to desired outputs such as code generation.

Training Process:

  • Data Collection: Sources from books, articles, code repositories, and online conversations

  • Preprocessing: Data cleaning and formatting for the ML algorithms to understand it effectively

  • Model Training: The neural network architecture is trained on the data. The network adjusts its internal parameters to learn how to map input data (user stories) to desired outputs (code snippets)

  • Fine-tuning: Fine-tune models for specific tasks like code generation, by training the model on relevant data (e.g., specific programming languages, coding conventions).

Generative AI: Neural-Network

Transformer Architecture - Not Autobots

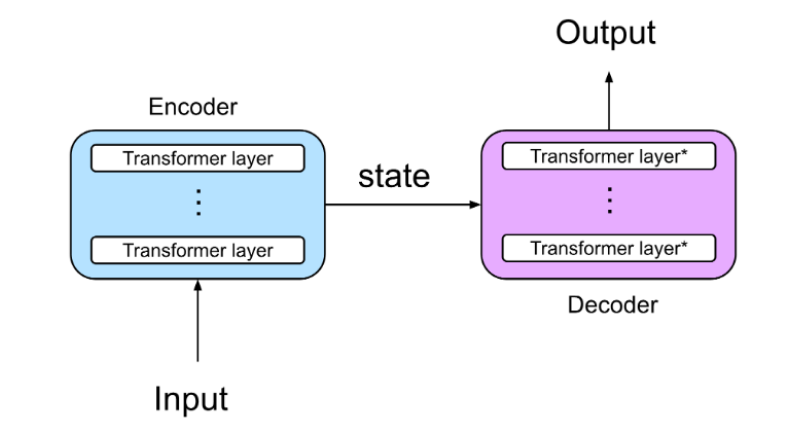
Transformer is a neural network architecture that excels at processing long sequences of text by analyzing relationships between words, no matter how far apart they are. This allows LLMs to understand complex language patterns and generate human-like text.

Components

  • Encoder: Process the input (use story) by using multiple encoder layers with self-attention Mechanism to analyze the relationship between words

  • Decoder: Uses the encoded information and its own attention mechanism to generate the output text (like code), ensuring it aligns with the text.

  • Attention Mechanism: Enables the model to effectively focus on the most important information for the task at hand, leading to improved NLP and generation capabilities.

Generative AI: Transformers encoder decoder attention mechanism

👉 Read: Attention is all you need by Google, 2017

Prompt Engineering - What is it?

Prompt engineering is the process of designing and optimizing prompts to better utilize LLMs. Well described prompts can help the AI models better understand the context and generate more accurate responses.

Features

  • Clarity and Specificity: Effective prompts are clear, concise, and specific about the task or desired response

  • Task Framing: Provide background information, specifying the desired output format (e.g., code, email, poem), or outlining specific requirements

  • Examples and Counter-Examples: Including relevant examples and counterexamples within the prompt can further guide the LLM

  • Instructional Language: Use clear and concise instructions to improve the LLM's understanding of what information to generate

User Story Prompt:

As a web developer, I want to create a React component with TypeScript for a login form that uses JSDoc for documentation, hooks for state management, includes a "Remember This Device" checkbox, and follows best practices for React and TypeScript development so that the code is maintainable, reusable, and understandable for myself and other developers, aligning with industry standards.

Needs:

- Component named "LoginComponent" with state management using hooks (useState)
- Input fields:
    - ID: "email" (type="email") - Required email field (as username)
    - ID: "password" (type="password") - Required password field
- Buttons:
    - ID: "loginButton" - "Login" button
    - ID: "cancelButton" - "Cancel" button
- Checkbox:
    - ID: "rememberDevice" - "Remember This Device" checkbox

Generate Code from User Stories - Practical Use Case

In the Agile methodology, user stories are used to capture requirements, tasks, or a feature from the perspective of a role in the system. For code generation, developers can write user stories to capture the context, requirements and technical specifications necessary to generate code with AI.

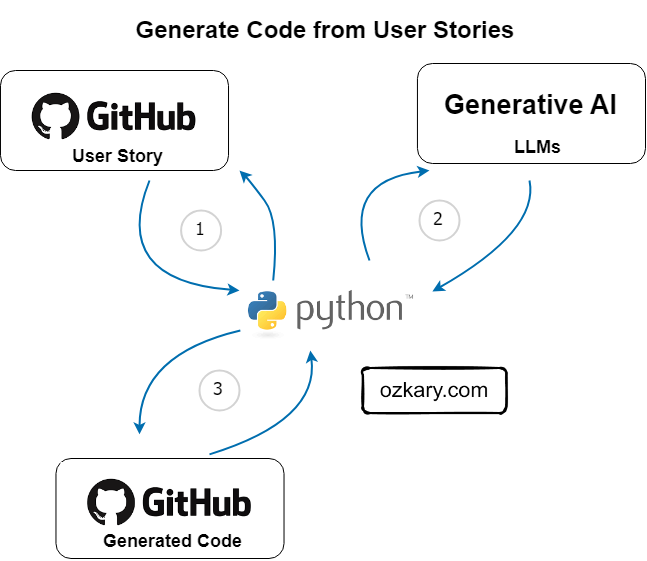
Code Generation Flow:

  • 1 User Story: Get the GitHub tasks with user story information

  • 2 LLM Model: Send the user story as a prompt to the LLM Model

  • 3 Generated Code: Send the generated code back to GitHub as a comment for a developer to review

👉 LLM generated code is not perfect, and developers should manually review and validate the generated code.

Generative AI: Generate Code Flow

How does LLMs Impact Development?

LLMs accelerate development by generating code faster, leading to shorter development cycles. They also automate documentation and empower exploration of complex algorithms, fostering innovation.

Features:

  • Code Completion: Analyze your code and suggest completions based on context

  • Code Synthesis: Describe what you want the code to do, and the LLM can generate the code

  • Code Refactoring: Analyze your code and suggest improvements for readability, performance, or best practices.

  • Documentation: Generate documentation that explains your code's purpose and functionality

  • Code Translation: Translate code snippets between different programming languages

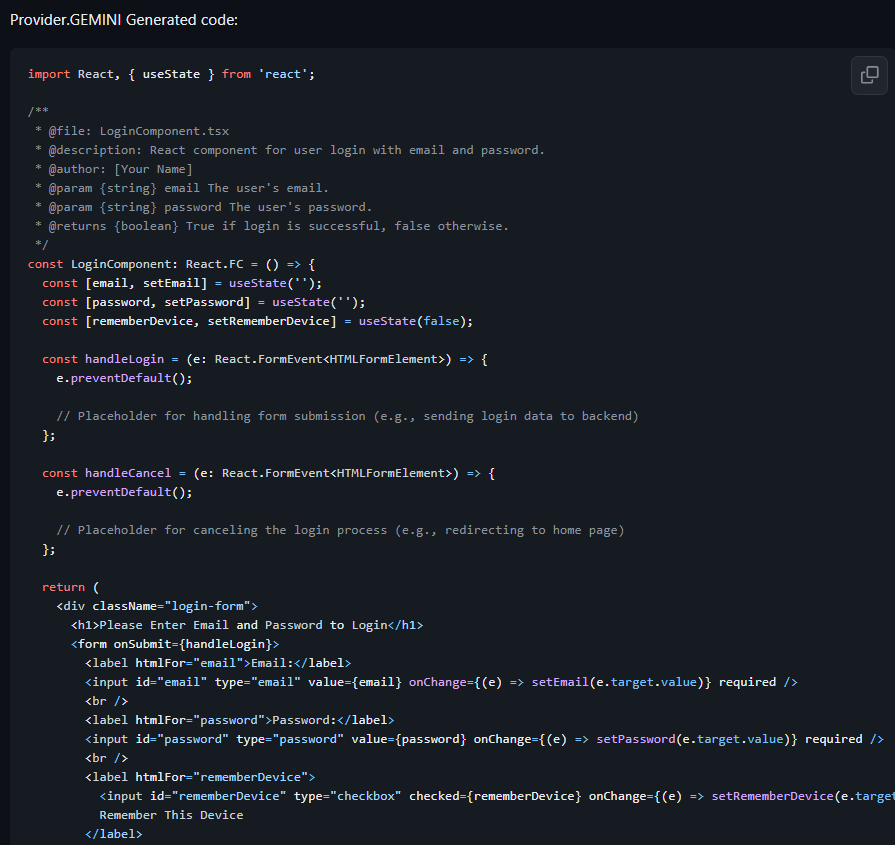
Generative AI: React Code Generation

👉 Security Concerns: Malicious actors could potentially exploit LLMs to generate harmful code.

What is Gemini AI?

Gemini is Google's next-generation large language model (LLM), unlocking the potential of Generative AI. This powerful tool understands and generates various data formats, from text and code to images and audio.

Components:

  • Gemini: Google's next-generation multimodal LLM, capable of understanding and generating various data formats (text, code, images, audio)

  • Gemini API: Integrate Gemini's into your applications with a user-friendly API

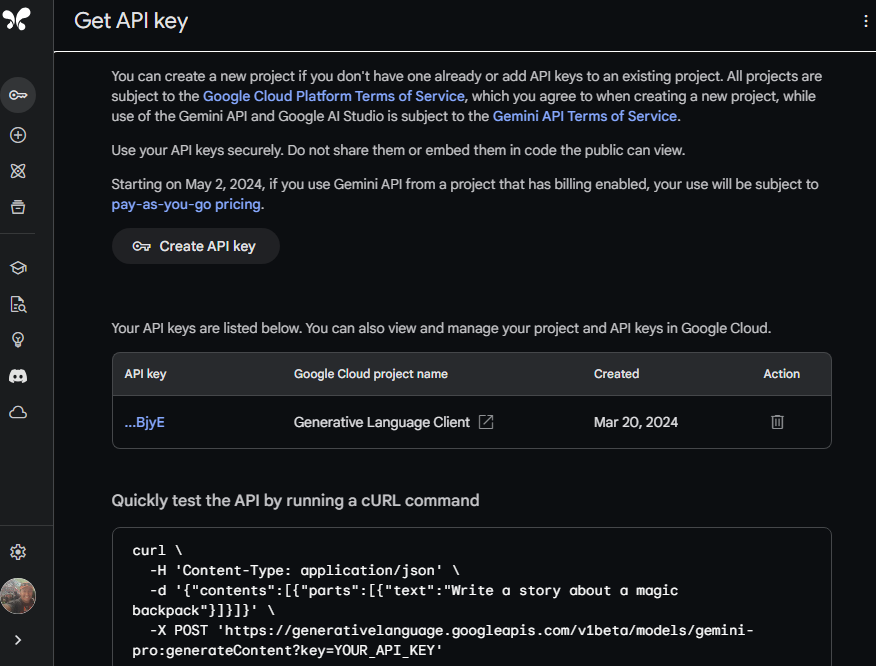
  • Google AI Studio: A free, web-based platform for prototyping with Gemini aistudio.google.com

    • Experiment with prompts and explore Gemini's capabilities
      • Generate creative text formats, translate languages
    • Export your work to code for seamless integration into your projects

Generative AI: Google AI Studio

👉 Multimodal LLMs can handle text, images, video, code

Generative AI for Development Summary

LLM plays a crucial role in code generation by harnessing its language understanding and generative capabilities. People in roles like developers, data engineers, scientists and others can utilize AI models to swiftly generate scripts in various programming languages, streamlining their programming tasks.

Common Tasks:

  • Code generation
  • Natural Language Processing (NLP)
  • Text summarization
  • Question answering

Architecture:

  • Multi-layered neural networks
  • Training process

    Transformer Architecture:

  • Encoder-Decoder structure
  • Attention mechanism

Prompt Engineering:

  • Crafting effective prompts with user stories

    Code Generation from User Stories:

    • Leveraging user stories for code generation

Thanks for reading.

Send question or comment at Twitter @ozkary

👍 Originally published by ozkary.com
6/3/23

Azure OpenAI API Service with CSharp

The OpenAI Service is a cloud-based API that provides access to Large Language Models (LLM) and Artificial Intelligence (AI) Capabilities. This API allows developers to leverage the LLM models to create AI application that can perform Natural Language Processing (NLP) tasks such as text generation, code generation, language translation and others.

Azure provides the Azure OpenAI services which integrates the OpenAI API in Azure infrastructure. This enables us to create custom hosting resources and access the OpenAI API with a custom domain and deployment configuration. There are API client libraries to support different programming languages. To access the Azure OpenAI API using .NET, we could use the OpenAI .NET client library and access an OpenAI resource in Azure. As an alternative, we could use the HttpClient class from the System.Net.Http namespace and code the HTTP requests.

👍 The OpenAI client libraries is available for Python, JavaScript, .NET, Java

In this article, we take a look at using the OpenAI API to generate code from a GitHub user story using an Azure OpenAI resource with the .NET client library.

👉 An Azure OpenAI resource can be created by visiting Azure OpenAI Portal

ozkary generate code from github user story

Install the OpenAI APi Client Dependencies

To use the client library, we first need to install the dependencies and configure some environment variables.

$ dotnet add package Azure.AI.OpenAI --prerelease

Install the OpenAI dependencies restoring the project file from this project

  • Clone this GitHub code repo: - LLM Code Generation
  • Open a terminal and navigate to the CSharp folder
    • Use the dotnet restore command when cloning the repository.
$ cd csharp/CodeGeneration
$ dotnet restore

This should download the code to your workstation.

Add the Azure OpenAI environment configurations

Get the following configuration information from your Azure OpenAI resource.

👍 This example uses a custom Azure OpenAI resource hosted at Azure OpenAI Portal

  • GitHub Repo API Token with write permissions to push comments to an issue
  • Get an OpenAI API key
  • If you are using an Azure OpenAI resource, get your custom end-point and deployment
    • The deployment should have the code-davinci-002 model

Set the linux environment variables with these commands:

$ echo export AZURE_OpenAI_KEY="OpenAI-key-here" >> ~/.bashrc && source ~/.bashrc
$ echo export GITHUB_TOKEN="github-key-here" >> ~/.bashrc && source ~/.bashrc
$ echo export AZURE_OpenAI_DEPLOYMENT="deployment-name" >> ~/.bashrc && source ~/.bashrc
$ echo export AZURE_OpenAI_ENDPOINT="https://YOUR-END-POINT.OpenAI.azure.com/" >> ~/.bashrc && source ~/.bashrc

Build and Run the Code

$ dotnet build

Describe the code

The code should run this workflow:

  • Get a list of open GitHub issues with the label user-story
  • Each issue content is sent to the OpenAI API to generate the code
  • The generated code is posted as a comment on the user-story for the developers to review

👍 The following code uses a simple API call implementation for the GitHub and OpenAI APIs. Use the code from this repo: - LLM Code Generation

    // Get environment variables
    private static readonly string openaiApiKey = Environment.GetEnvironmentVariable("AZURE_OPENAI_KEY") ?? String.Empty;    
    private static readonly string openaiBase = Environment.GetEnvironmentVariable("AZURE_OPENAI_ENDPOINT") ?? String.Empty;       
    private static readonly string openaiEngine = Environment.GetEnvironmentVariable("AZURE_OPENAI_DEPLOYMENT") ?? String.Empty;           

    // GitHub API endpoint and authentication headers    
    private static readonly string githubToken = Environment.GetEnvironmentVariable("GITHUB_TOKEN") ?? String.Empty;

    /// <summary>
    /// Process a GitHub issue by label.
    /// </summary>
    public static async Task ProcessIssueByLabel(string repo, string label)
    {
        try
        {
            // Get the issues from the repo
            var @params = new Parameter { Label = label, State = "open" };              
            List<Issue> issues = await GitHubService.GetIssues(repo, @params, githubToken);
            if (issues != null)
            {
                foreach (var issue in issues)
                {
                    // Generate code using OpenAI
                    Console.WriteLine($"Generating code from GitHub issue: {issue.title} to {openaiBase}");
                    OpenAIService openaiService = new OpenAIService(openaiApiKey, openaiBase, openaiEngine);
                    string generatedCode = await openaiService.Create(issue.body ?? String.Empty);

                    if (!string.IsNullOrEmpty(generatedCode))
                    {
                        // Post a comment with the generated code to the GitHub issue
                        string comment = $"Generated code:\n\n```{generatedCode}\n```";
                        bool commentPosted = await GitHubService.PostIssueComment(repo, issue.number, comment, githubToken);

                        if (commentPosted)
                        {
                            Console.WriteLine("Code generated and posted as a comment on the GitHub issue.");
                        }
                        else
                        {
                            Console.WriteLine("Failed to post the comment on the GitHub issue.");
                        }
                    }
                    else
                    {
                        Console.WriteLine("Failed to generate code from the GitHub issue.");
                    }
                }
            }
            else
            {
                Console.WriteLine("Failed to retrieve the GitHub issue.");
            }
        }
        catch (Exception ex)
        {
            Console.WriteLine($"Error: {ex.Message}");
        }
    }

The OpenAI service class handles the OpenAI API details. It takes default parameters for the model deployment (engine), temperature and token limits, which control the cost and amount of text (roughly four letters per token) that should be allowed. For this service, we use the "Completion" model which allows developers to interact with OpenAI's language models and generate text-based completions.


internal class OpenAIService
    {
        private string apiKey;
        private string engine;
        private string endPoint;
        private float temperature;
        private int maxTokens;
        private int n;
        private string stop;

        /// <summary>
        /// OpenAI client
        /// </summary>
        private OpenAIClient? client;

        public OpenAIService(string apiKey, string endPoint, string engine = "text-davinci-003", float temperature = 0.5f, int maxTokens = 350, int n = 1, string stop = "")
        {
            // Configure the OpenAI client with your API key and endpoint                 
            client = new OpenAIClient(new Uri(endPoint), new AzureKeyCredential(apiKey));
            this.apiKey = apiKey;
            this.endPoint = endPoint;            
            this.engine = engine;
            this.temperature = temperature;
            this.maxTokens = maxTokens;
            this.n = n;
            this.stop = stop;                
        }

        /// <summary>
        /// Create a completion from a prompt
        /// </summary>
        public async Task<string> Create(string prompt)
        {     
            var result = String.Empty;

            if (!String.IsNullOrEmpty(prompt) && client != null)
            {

                Response<Completions> completionsResponse = await client.GetCompletionsAsync(engine, prompt);

                Console.WriteLine(completionsResponse);
                result = completionsResponse.Value.Choices[0].Text.Trim();                
                Console.WriteLine(result);
            }

            return result;            
        }
    }

Run the code

After configuring your environment and downloading the code, we can run the code from a terminal by typing the following command from the project folder:

👉 Make sure to enter your repo name and label your issues with either user-story or any other label you would rather use.

# dotnet run --repo ozkary/ai-engineering --label user-story

After running the code successfully, we should be able to see the generated code as a comment on the GitHub issue.

ozkary-ai-engineering-generate-code-from-user-stories

Summary

The Azure OpenAI Service provides a seamless integration of OpenAI models into the Azure platform, offering the benefits of Azure's security, compliance, management, and billing capabilities. On the other hand, using the OpenAI API directly allows for a more direct and independent integration with OpenAI services. It may be a preferable option if you have specific requirements, and you do not want to use Azure resources.

Thanks for reading.

Send question or comment at Twitter @ozkary

👍 Originally published by ozkary.com
4/22/23

Data Engineering Process Fundamentals - Design and Planning Exercise

Having laid a strong design foundation, it's time to embark on a hands-on exercise that's crucial to our data engineering project's success. Our immediate focus is on building the essential cloud resources that will serve as the backbone for our data pipelines, data lake, and data warehouse. Taking a cloud-agnostic approach ensures our implementation remains flexible and adaptable across different cloud providers, enabling us to leverage the advantages of multiple platforms or switch providers seamlessly if required. By completing this step, we set the stage for efficient and effective coding of our solutions. Let's get started on this vital infrastructure-building journey.

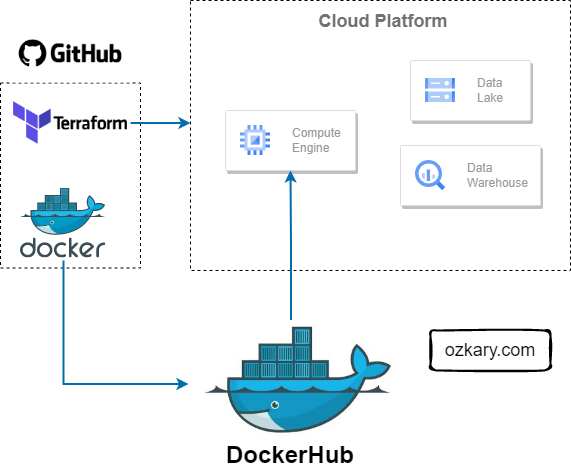
ozkary-data-engineering-design-planning-docker-terraform

Cloud Infrastructure Planning

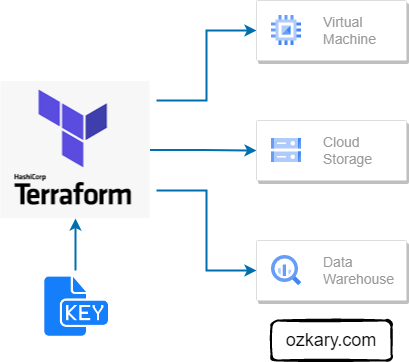
Infrastructure planning is a critical aspect of every technical project, laying the foundation for successful project delivery. In the case of a Data Engineering project, it becomes even more crucial. To support our project's objectives, we need to carefully consider and provision specific resources:

  • VM instance: This serves as the backbone for hosting our data pipelines and orchestration, ensuring efficient execution of our data workflows.
  • Data Lake: A vital component for storing various data formats, such as CSV or Parquet files, in a scalable and flexible manner.
  • Data Warehouse: An essential resource that hosts transformed and curated data, providing a high-performance environment for easy access by visualization tools.

Infrastructure automation, facilitated by tools like Terraform, is important in modern data engineering projects. It enables the provisioning and management of cloud resources, such as virtual machines and storage, in a consistent and reproducible manner. Infrastructure as Code (IaC) allows teams to define their infrastructure declaratively, track it in source control, version it, and apply changes as needed. Automation reduces manual efforts, ensures consistency, and enables infrastructure to be treated as a code artifact, improving reliability and scalability.

ozkary-data-engineering-terraform

Infrastructure Implementation Requirements

When using Terraform with a any cloud provider, there are several key artifacts and considerations to keep in mind for successful configuration and security. Terraform needs access to the cloud account where it can provision the resources. The account token or credentials can vary based on your cloud configuration. For our purpose, we will use a GCP (Google) project to build our resources, but first we need to install the Terraform dependencies for the development environment.

Install Terraform

To install Terraform, open a bash terminal and run the commands below:

  • Download the package file
  • Unzip the file
  • Copy the Terraform binary from the extracted file to the /usr/bin/ directory
  • Verify the version
$ wget https://releases.hashicorp.com/terraform/1.3.7/terraform_1.3.7_linux_amd64.zip
$ unzip terraform_1.1.2_linux_amd64.zip
$ cp terraform /usr/bin/
$ terraform -v

We should get an output similar to this:

Terraform v1.3.7
on linux_amd64

Configure a Cloud Account

Create a Google account. Here

  • Create a new project
  • Make sure to keep track of the Project ID and the location for your project

Create a service account

  • In the left-hand menu, click on "IAM & Admin" and then select "Service accounts"
  • Click on the "Create Service Account" button at the top of the page
  • Enter a name for the service account and an optional description
  • Then add the BigQuery Admin, Storage Admin, Storage Object Admin as roles for our service account and click the save button.

ozkary gcp roles

Authenticate the VM or Local environment with GCP

  • In the left navigation menu (GCP), click on "IAM & Admin" and then "Service accounts"
  • Click on the three verticals dots under the action section for the service name you just created
  • Then click Manage keys, Add key, Create new key. Select JSON option and click Create
  • Move the key file to a system folder
$ mkdir -p $HOME/.gcp/ 
$ mv ~/Downloads/{xxxxxx}.json ~/.gcp/{acc_credentials}.json
  • install the SDK and CLI Tools
  • Validate the installation and login to GCP with the following commands
    $ echo 'export GOOGLE_APPLICATION_CREDENTIALS="~/.gcp/{acc_credentials}.json"' >> ~/.bashrc
    $ export GOOGLE_APPLICATION_CREDENTIALS="~/.gcp/{acc_credentials}.json"
    $ gcloud auth application-default login
    
  • Follow the login process on the browser

Review the Code

👉 Clone this repo or copy the files from this folder

Terraform uses declarative configuration files written in a domain-specific language (DSL) called HCL (HashiCorp Configuration Language). It provides a concise and human-readable syntax for defining resources, dependencies, and configurations, enabling us to provision, modify, and destroy infrastructure in a predictable and reproducible manner.

At a minimum, we should define a variables file, which contains the cloud provider information and a resource file which define what kind of resources should be provision on the cloud. There could be a file for each resource or a single file can define multiple resources.

Variables File

The variables file is used to define a set of variables that can be used on the resource file. This allows for the use of those variables in one more more resource configuration files. The format looks as follows:

locals {
  data_lake_bucket = "mta_data_lake"
}

variable "project" {
  description = "Enter Your GCP Project ID"
  type = string
}

variable "region" {
  description = "Region for GCP resources. Choose as per your location: https://cloud.google.com/about/locations"
  default = "us-east1"
  type = string
}

variable "storage_class" {
  description = "Storage class type for your bucket. Check official docs for more info."
  default = "STANDARD"
  type = string
}

variable "stg_dataset" {
  description = "BigQuery Dataset that raw data (from GCS) will be written to"
  type = string
  default = "mta_data"
}

variable "vm_image" {
  description = "Base image for your Virtual Machine."
  type = string
  default = "ubuntu-os-cloud/ubuntu-2004-lts"
}

Resource File

The resource file is where we define what should be provisioned on the cloud. This is also the file where we need to define the provider specific resources that need to be created.

terraform {
  required_version = ">= 1.0"
  backend "local" {}  # Can change from "local" to "gcs" (for google) or "s3" (for aws), if you would like to preserve your tf-state online
  required_providers {
    google = {
      source  = "hashicorp/google"
    }
  }
}

provider "google" {
  project = var.project
  region = var.region
  // credentials = file(var.credentials)  # Use this if you do not want to set env-var GOOGLE_APPLICATION_CREDENTIALS
}

# Data Lake Bucket
# Ref: https://registry.terraform.io/providers/hashicorp/google/latest/docs/resources/storage_bucket
resource "google_storage_bucket" "data-lake-bucket" {
  name          = "${local.data_lake_bucket}_${var.project}" # Concatenating DL bucket & Project name for unique naming
  location      = var.region

  # Optional, but recommended settings:
  storage_class = var.storage_class
  uniform_bucket_level_access = true

  versioning {
    enabled     = true
  }

  lifecycle_rule {
    action {
      type = "Delete"
    }
    condition {
      age = 15  // days
    }
  }

  force_destroy = true
}

# BigQuery data warehouse
# Ref: https://registry.terraform.io/providers/hashicorp/google/latest/docs/resources/bigquery_dataset
resource "google_bigquery_dataset" "stg_dataset" {
  dataset_id = var.stg_dataset
  project    = var.project
  location   = var.region
}

# VM instance
resource "google_compute_instance" "vm_instance" {
  name          = "mta-instance"
  project       = var.project
  machine_type  = "e2-standard-4"
  zone          = var.region

  boot_disk {
    initialize_params {
      image = var.vm_image
    }
  }

  network_interface {
    network = "default"

    access_config {
      // Ephemeral public IP
    }
  }
}

This Terraform file defines the infrastructure components to be provisioned on the Google Cloud Platform (GCP). It includes the configuration for the Terraform backend, required providers, and the resources to be created.

  • The backend section specifies the backend type as "local" for storing the Terraform state locally. It can be changed to "gcs" or "s3" for cloud storage if desired.
  • The required_providers block defines the required provider and its source, in this case, the Google Cloud provider.
  • The provider block configures the Google provider with the project and region specified as variables. It can use either environment variable GOOGLE_APPLICATION_CREDENTIALS or the credentials file defined in the variables.
  • The resource blocks define the infrastructure resources to be created, such as a Google Storage Bucket for the data lake, Google BigQuery datasets for staging and production, and a Google Compute Engine instance named "mta-instance" with specific configuration settings.

Overall, this Terraform file automates the provisioning of a data lake bucket, BigQuery datasets, and a virtual machine instance on the Google Cloud Platform.

How to run it!

  • Refresh service-account's auth-token for this session
$ gcloud auth application-default login
  • Set the credentials file on the bash configuration file
    • Add the export line and replace filename-here with your file
$ echo export GOOGLE_APPLICATION_CREDENTIALS="${HOME}/.gcp/filename-here.json" >> ~/.bashrc && source ~/.bashrc
  • Open the terraform folder in your project

  • Initialize state file (.tfstate) by running terraform init

$ cd ./terraform
$ terraform init
  • Check changes to new infrastructure plan before applying them

It is important to always review the plan to make sure no unwanted changes are showing up.

👉 Get the project id from your GCP cloud console and replace it on the next command

$ terraform plan -var="project=<your-gcp-project-id>"
  • Apply the changes

This provisions the resources on the cloud project.

$ terraform apply -var="project=<your-gcp-project-id>"
  • (Optional) Delete infrastructure after your work, to avoid costs on any running services
$ terraform destroy

Terraform Lifecycle

ozkary-data-engineering-terraform-lifecycle

GitHub Action

In order to be able to automate the building of infrastructure with GitHub, we need to define the cloud provider token as a secret with GitHub. This can be done by following the steps from this link:

👉 Configure GitHub Secrets

Once the secret has been configured, we can create a build action script with the cloud provider secret information as shown with this GitHub Action workflow YAML file:


name: Terraform Deployment

on:
  push:
    branches:
      - main

jobs:
  deploy:
    runs-on: ubuntu-latest

    steps:
    - name: Checkout repository
      uses: actions/checkout@v2

    - name: Set up Terraform
      uses: hashicorp/setup-terraform@v1

    - name: Terraform Init
       env:        
        GOOGLE_APPLICATION_CREDENTIALS:  ${{ secrets.GOOGLE_APPLICATION_CREDENTIALS }}
      run: |
        cd Step2-Cloud-Infrastructure/terraform
        terraform init

    - name: Terraform Apply
      run: |
        cd path/to/terraform/project
        terraform apply -auto-approve

Conclusion

With this exercise, we gain practical experience in using tools like Terraform to automate the provisioning of resources, such as VM, a data lakes and other components essential to our data engineering system. By following cloud-agnostic practices, we can achieve interoperability and avoid vendor lock-in, ensuring our project remains scalable, cost-effective, and adaptable to future requirements.

Next Step

After building our cloud infrastructure, we are now ready to talk about the implementation and orchestration of a data pipeline and review some of the operational requirements that can enable us to make decisions.

Coming Soon!

👉 [Data Engineering Process Fundamentals - Data Pipeline and Orchestration]

Thanks for reading.

Send question or comment at Twitter @ozkary

👍 Originally published by ozkary.com
3/18/23

GitHub Codespaces Quick Review

This is a quick review about GitHub Codespaces, which you can load right on the browser.
ozkary github codespaces review

In this video, we talk about creating a Codespaces instance from a GitHub Repository. We load a GitHub project using the VM instance that is provisioned for us when a GitHub Codespace is added to the repo. To edit the project files, the browser loads a VS Code online version of the IDE, which then uses the SSH protocol to virtualize the code from the VM onto our browser. Since we are basically using a VM, we can open a terminal from the browser session and run NPM and Git commands. All these commands are executed on the VM. GitHub Codespaces are a quick way to provision a VM instance without the complexity of manually building on a cloud account.

Thanks for reading.

Send question or comment at Twitter @ozkary

Originally published by ozkary.com
1/14/23

Use Remote Dev Container with GitHub Codespaces


As Software Engineers, we usually work with multiple projects in parallel. This forces us to configure our work stations with multiple software development tools, which eventually leaves our workstation performing poorly. To overcome this problem, we often use virtual machine (VM) instances that run in our workstations or a cloud provider like Azure. Setting up those VMs also introduces some overhead into our software development process. As engineers, we want to be able to accelerate this process by using a remote development environment provider like GitHub Codespaces.


ozkary-github-codespaces-layers

What is GitHub Codespaces?


GitHub Codespaces is a cloud hosted development environment that is associated to a GitHub repository. Each environment or Dev Container is cloud hosted in a Docker container with the core dependencies that are required for that project. The container is hosted on a VM running Ubuntu Linux. The hardware is also configurable. It starts with a minimum of 2 cores, 8 GB of RAMs and 32 GB of storage, which should be a good foundation to run small projects. In addition, the hardware resources can be increased up to 32 cores, 64 GB RAM and 128 GB of storage which matches a very good workstation configuration.


👍 There are monthly quotas for using the remote environments of 120 hrs for personal accounts, and 180 hrs for the PRO account.


How to use Codespaces?


Codespaces leverages the Secure Shell (SSH) protocol, which provides a secure channel between client and server.  This protocol is used to provide remote access to resources like VMs that are hosted on cloud platforms. This protocol makes it possible for browsers and IDE tools like VS Code to connect remotely and manage the projects.


When using the browser, the VS Code Browser IDE is loaded. We can also use a local installation of VS Code or any IDE that support SSH. The development process works the same way as if running locally with the exception that the files are hosted remotely, and we can also use a terminal window to execute build commands within the VM space.


How to start a project with GitHub Codespaces


We can start a Codespaces environment right from GitHub. Open a repo on GitHub and click on the Code tab and then click the Code button from the toolbar. This opens up the options to create a new Codespaces, connect to an existent one, or even configure your Codespaces resources, more on this later. 


👍 You can use this repo if you do not have one https://github.com/ozkary/Data-Engineering-Bootcamp


ozkary-create-github-code-space


When you add a new environment, GitHub essentially provisions a VM on Azure. It loads a Docker image with some of the dependencies of your project. For example, if your code is .Net Core or a TypeScript with React project, a Docker image with those dependencies is built and provisioned into the VM.


👍 The Docker images are preconfigured. We can also build a custom image to meet specific requirements.


Once the environment is provisioned, we can open the project using any of the options listed on the image below. I prefer to use my local VS Code instance, as I often have all the tools needed to work on my projects. Once the project is open on VS Code, the project connection is cached, and we only need to open VS Code again to load the remote project. The browser feature is also very useful, so do take it for a spin and see how you like it.


ozkary how to open github codespaces


Use a Terminal to Manage the Project


When the project is open remotely, we can run common activities like adding additional dependencies, building and debugging the project. Since the environment is running on Ubuntu, we can open a terminal window on VS Code. This enables us to run the CLI commands that we need in order to manage our project. 


In the case of Web projects, we can run the project remotely using our browser. Even though the project runs remotely on the VM, port forwarding is used for secured remote access, so we can open our local browser and load the app. We can see the forwarded ports for our application on the ports tab of VS Code.


ozkary vscode port forwarding


Managing your Codespaces Instance

In some cases, we may see some performance issue on our remote environment. If this is the case, we need to inspect the current instance configuration and if possible upgrade the resources. Since this is an Ubuntu instance, we can use the terminal to run commands like lscpu to check the current configuration like cpu’s and memory. We can also use the Codespaces command toolbar and change the machine type, which provides a quick shortcut to change the machine type or configure the container. 


The Dev Container can also be customized by making changes to the devcontainer.json file. Additional customization can be done by building a custom Docker image to meet specific development environment requirements.


👍 When the Dev Container is changed, the VM requires a re-start, which is done automatically


ozkary github codespaces vscode commands

Summary


By leveraging the use of remote managed development environments, software engineers can save time by not having to work on a development environment configuration, we can instead use GitHub Codespaces to quickly provision Dev Containers that get us up and running in a short time, thus allowing us to focus on our development tasks instead of environment managing tasks.


Thanks for reading.


Send question or comment at Twitter @ozkary

Originally published by ozkary.com
7/17/21

App Branding Strategy with GitHub Branches and Actions

Branding applications is a common design requirement. The concept is simple. We have an application with functional core components, but based on the partner or client, we need to change the theme or look of the design elements to match that of the client’s brand. Some of these design elements may include images, content, fonts, and theme changes. There are different strategies to support an app branding process, either in the build process or at runtime. In this article, we discuss how we can support a branding strategy using a code repository branching strategy and GitHub build actions.

Branching Strategy

A code repository enables us to store the source code for software solutions. Different branches are mostly used for feature development and production management purposes. In the case of branding applications, we want to be able to use branches for two purposes. The first is to be able to import the assets that are specific to the target brand. The second is to associate the branch to build actions which are used to build and deploy the branded application.

To help us visualize how this process works, let’s work on a typical branding use case. Think of an app for which there is a requirement to support two different brands, call them brand-a and brand-b. With this in mind, we should think about the design elements that need to be branded. For our simple case, those elements include the app title, logo, text, or messaging in JSON files, fonts, and the color theme or skin.

We now need to think of the build and deployment requirements for these two brands. We understand that each brand must be deployed to a different hosting resource with different URLs, let’s say those sites are hosted at brand-a.ozkary.com and brand-b.ozkary.com, These could be Static Web App or CDN hosting resources.

With the understanding that the application needs to be branded with different assets and must be built and deployed to different hosting sites, we can conclude that a solution will be to create different branches which can help us implement the design changes to the app and at the same time, enable us to deploy them correctly by associating a GitHub build action to each branch.

Branching Strategy Strategy for Branding Apps
GitHub Actions

GitHub Actions makes it easy to automate Continuous Integration / Continuous Delivery (CI/CD) pipelines.  It is essentially a workflow that executes commands from a YML file to run actions like unit test, NPM build or any other commands that can be executed on the CLI to build the application.

A GitHub Action or workflow is triggered when there is a pull request (PR) on a branch. This is basically a code merge into the target branch. The workflow executes all the actions that are defined by the script. The typical build actions would be to pull the current code, move the files to a staging environment, run the build and unit test commands, and finally push the built assets into the target hosting location.

A GitHub Action is the great automation tool to meet the branding requirements because it enables us to customize the build with the corresponding brand assets prior to building the application. There is however some additional planning, so before we can work on the build, we need to define the implementation strategy to support a branding configuration.

Implementation Strategy

When coding a Web application with JavaScript frameworks, a common pattern is to import components and design elements into the container or pages of the application from their folder/path location. This works by either dynamically loading those files at runtime or loading them a design/build time.

The problem with loading dynamic content at runtime is that this requires that all the different brand assets be included in the build. This often leads to a big and slow build process as all those files need to be included. The design time approach is more effective as the build process would only include those specific features into the build, making the build process smaller and faster.

Using the design time approach does require a strategy. Even though, we could make specific file changes on the branch, to add the brand-a files as an example, and commit them, this is a manual process that is error prompt. We instead need an approach that is managed by the build process. For this process to work, we need to think of a folder structure within our project to better support it. Let’s review an approach.

Ozkary Branching Strategy Branding Folders

After reviewing the image of the folder structure, we should notice that the component files import the resources from the same specific folder location, content. This off course is not enough to support branding, but by looking carefully, we should see that we have brand resources outside the src folder of the project in the brands' folder. There are also additional folders for each brand with the necessary assets.

This way this works is that only the files within the src and public folders are used for the build process. Files outside the src folder should not be included in the build, but they are still within source control.  The plan is to be able to copy the brand files into the src/content folder before the build action takes place. This is where we leverage a custom action on the GitHub workflow.

Custom Action

GitHub Actions enable us to run commands or actions during the build process. These actions are defined as a step within the build job, so a step to meet the branding requirements can be inserted into the job, which can handle copying the corresponding files to the content folders. Let’s look at a default workflow file that is associated to a branch, so we can see clearly how it works.

Ozkary Branching Strategy Build Action

By default, the workflow has two steps, it first checks out or pull all the files from the code repo. It then executes the build commands that are defined in the package.json file. This is the steps that generates the build output, which is deployed to the hosting location. The logical step here is to insert a step or multiple steps to copy the files from all the brand subfolders. After making this suggested change, the workflow file should look as follows:

Ozkary Branching Strategy Custom Action

The new steps just copy files from the target brand folder into the src and public folders.  This should enable the build process to find those brand specific files and build the application with the new logo, fonts, and theme. The step to copy the fonts does some extra work. The reason is that the font files have different font family names, so we want to be able to find all the files and delete them first. We can then move forward and copy the new files.

It is important to notice that the SASS files, SCSS extension, are key players on this process. Those are the files that provide variable and font information to support the new color theme, styles, and fonts. When using SASS, the rest of the components only import those files and use the variables for their corresponding styles. This approach minimizes the number of files that need to be customized. The _font.scss file, for example, handles the font file names for the different brands, as those files are named differently.

 For cases where SASS is not used, it is OK to instead copy over the main CSS files that defines the color theme and style for the app, but the point should be to minimize the changes by centralizing the customization just by defining variables instead of changing all the style files as this can become hard to manage.

Conclusion

Branding applications is a common design requirement which can become difficult to manage without the right approach. By using a branching strategy and GitHub custom action, we can manage this requirement and prevent build problems by distributing the branded assets in different directory to keep the build process small. This approach also helps  eliminate the need to have developers make code commits just to make import reference changes.

Thanks for reading.

Gist Files

Originally published by ozkary.com