Data Streaming - Exercise
Now that we've covered the concepts of data streaming, let's move forward with an actual coding exercise. During this exercise, we'll delve into building a Kafka message broker and a Spark consumer with the objective of having the Kafka message broker work as a data producer for our subway system information. The Spark consumer acts as a message aggregator and writes the results to our data lake. This allows the data modeling process to pick up the information and insert it into the data warehouse, providing seamless integration and reusing our already operational data pipeline.
Batch Process vs Data Stream
In a batch process data pipeline, we define a schedule to process the data from its source. With a data stream pipeline, there is no schedule as the data flows as soon as it is available from its source.
In the batch data download, the data is aggregated for periods of four hours. Since the data stream comes in more frequently, there is no four-hour aggregation. The data comes in as single transactions.
Data Stream Strategy
From our system requirements, we already have a data pipeline process that runs an incremental update process to import the data from the data lake into our data warehouse. This process already handles data transformation, mapping, and populates all the dimension tables and fact tables with the correct information.
Therefore, we want to follow the same pipeline process and utilize what already exists. To account for the fact that the data comes in as a single transaction, and we do not want to create single files, we want to implement an aggregation strategy on our data streaming pipeline. This enables us to define time windows for when to publish the data, whether it's 1 minute or 4 hours. It really depends on what fits the business requirements. The important thing here is to understand the technical capabilities and the strategy for the solution.
Data Streaming Data Flow Process
To deliver a data streaming solution, we typically employ a technical design illustrated as follows:
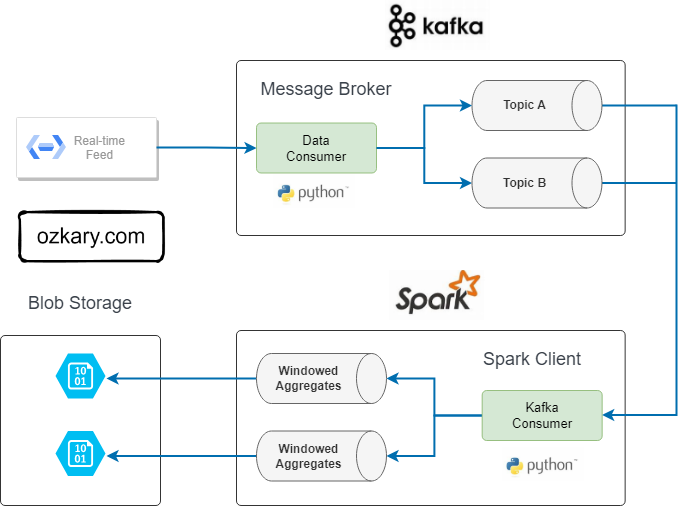
Kafka
- Producer
- Topics
- Consumer
Spark
- Kafka Consumer
- Message Parsing and Aggregations
- Write to Data Lake or Other Storage
Kafka:
- Producer: The producer is responsible for publishing data to Kafka topics. It produces and sends messages to specific topics, allowing data to be ingested into the Kafka cluster.
- Topics: Topics are logical channels or categories to which messages are published by producers and from which messages are consumed by consumers. They act as data channels, providing a way to organize and categorize messages.
- Consumer: Consumers subscribe to Kafka topics and process the messages produced by the producers. They play a vital role in real-time data consumption and are responsible for extracting valuable insights from the streaming data.
Spark:
Kafka Consumer: This component serves as a bridge between Kafka and Spark, allowing Spark to consume data directly from Kafka topics. It establishes a connection to Kafka, subscribes to specified topics, and pulls streaming data into Spark for further processing.
Message Parsing and Aggregations: Once data is consumed from Kafka, Spark performs message parsing to extract relevant information. Aggregations involve summarizing or transforming the data, making it suitable for analytics or downstream processing. This step is crucial for deriving meaningful insights from the streaming data.
Write to Data Lake or Other Storage: After processing and aggregating the data, Spark writes the results to a data lake or other storage systems. A data lake is a centralized repository that allows for the storage of raw and processed data in its native format. This step ensures that the valuable insights derived from the streaming data are persisted for further integration to a data warehouse.
Implementation Requirements
👉 Clone this repo or copy the files from this folder Streaming
For our example, we will adopt a code-centric approach and utilize Python to implement both our producer and consumer components. Additionally, we'll require instances of Apache Kafka and Apache Spark to be running. To ensure scalability, we'll deploy these components on separate virtual machines (VMs). Our Terraform scripts will be instrumental in creating new VM instances for this purpose. It's important to note that all these components will be encapsulated within Docker containers.
👉 For the ease of development in this lab, we can run everything on a single VM or local workstations. This allows us to bypass the complexities associated with network configuration. For real deployments, we should use separate VMs.
Requirements
- Docker and Docker Hub
- Prefect dependencies and cloud account
- Install the Prefect Python library dependencies
- Create a Prefect Cloud account
- Data Lake for storage
- Make sure to have the storage account and access ready
👉 Before proceeding with the setup, ensure that the storage and Prefect credentials have been configured as shown on the Orchestration exercise step.
Docker
For running this locally or on virtual machines (VMs), the optimal approach is to leverage Docker Containers. In this exercise, we'll utilize a lightweight configuration of Kafka and Spark using Bitnami images. This configuration assumes a minimal setup with a Spark Master, a Spark Worker, and a Kafka broker.
Docker provides a platform for packaging, distributing, and running applications within containers. This ensures consistency across different environments and simplifies the deployment process. To get started, you can download and install Docker from the official website (https://www.docker.com/get-started). Once Docker is installed, the Docker command-line interface (docker) becomes available, enabling us to efficiently manage and interact with containers.
Docker Compose file
Utilize the docker-bitnami.compose.yaml file to configure a unified environment where both of these services should run. In the event that we need to run these services on distinct virtual machines (VMs), we would deploy each Docker image on a separate VM.
version: "3.6"
services:
  spark-master:
    image: bitnami/spark:latest
    container_name: spark-master
    environment:
      SPARK_MODE: "master"
    ports:
      - 8080:8080

  spark-worker:
    image: bitnami/spark:latest
    container_name: spark-worker
    environment:
      SPARK_MODE: "worker"
      SPARK_MASTER_URL: "spark://spark-master:7077"
    ports:
      - 8081:8081
    depends_on:
      - spark-master

  kafka:
    image: bitnami/kafka:latest
    container_name: kafka
    ports:
      - "9092:9092"
      - "29092:29092"  # Used for internal communication
    environment:
      KAFKA_LISTENER_SECURITY_PROTOCOL_MAP: PLAINTEXT:PLAINTEXT,PLAINTEXT_HOST:PLAINTEXT
      KAFKA_ADVERTISED_LISTENERS: PLAINTEXT://kafka:9092,PLAINTEXT_HOST://localhost:9092
      KAFKA_LISTENER_SECURITY_PROTOCOL_MAP: LISTENER_BOB:PLAINTEXT,LISTENER_FRED:PLAINTEXT
      KAFKA_LISTENERS: LISTENER_BOB://kafka:29092,LISTENER_FRED://kafka:9092
      KAFKA_ADVERTISED_LISTENERS: LISTENER_BOB://kafka:29092,LISTENER_FRED://localhost:9092
      KAFKA_INTER_BROKER_LISTENER_NAME: LISTENER_BOB
      KAFKA_OFFSETS_TOPIC_REPLICATION_FACTOR: 1
      KAFKA_GROUP_INITIAL_REBALANCE_DELAY_MS: 0
      KAFKA_TRANSACTION_STATE_LOG_MIN_ISR: 1
      KAFKA_TRANSACTION_STATE_LOG_REPLICATION_FACTOR: 1
    depends_on:
      - spark-master
Download the Docker Images
Before we proceed to run the Docker images, it's essential to download them in the target environment. To download the Bitnami images, you can execute the following script from a Bash command line:
$ bash download_images.sh
- download_images.sh script
echo "Downloading Spark and Kafka Docker images..."

# Spark images from Bitnami
docker pull bitnami/spark:latest

# Kafka image from Bitnami
docker pull bitnami/kafka:latest

echo "Images downloaded successfully!"

# Display image sizes
echo "Image sizes:"
docker images bitnami/spark:latest bitnami/kafka:latest --format "{{.Repository}}:{{.Tag}} - {{.Size}}"
The download_images.sh script essentially retrieves two images from DockerHub. This script provides an automated way to download these images when creating new environments.
Start the Services
Once the Docker images are downloaded, initiate the services by executing the following script:
bash start_services.sh
- start_services.sh script
#!/bin/bash

# Navigate to the Docker folder
cd docker

# Start Spark Master and Spark Worker
docker-compose up -f docker-compose-bitnami.yml -d spark-master spark-worker

# Wait for Spark Master and Worker to be ready (adjust sleep time as needed)
sleep 15

# Start Kafka and create Kafka topic
docker-compose up -d kafka

# Wait for Kafka to be ready (adjust sleep time as needed)
sleep 15

# Check if the Kafka topic exists before creating it
topic_exists=$(docker-compose exec kafka /opt/bitnami/kafka/bin/kafka-topics.sh --list --topic ozkary-topic --bootstrap-server localhost:9092 | grep "mta-turnstile")

if [ -z "$topic_exists" ]; then
  # Create Kafka topic
  docker-compose exec kafka /opt/bitnami/kafka/bin/kafka-topics.sh --create --topic mta-turnstile --partitions 1 --replication-factor 1 --bootstrap-server localhost:9092
  echo "Kafka topic created!"
else
  echo "Kafka topic already exists, no need to recreate."
fi

echo "Services started successfully!"
The start_services.sh script performs the following tasks:
- Initiates Spark Master and Spark Worker services in detached mode (-d).
- Launches Kafka service in detached mode.
- Utilizes
docker-compose execto execute the Kafka topic creation command inside the Kafka container.
At this juncture, both services should be operational and ready to respond to client requests. Now, let's delve into implementing our applications.
Data Specifications
In this data streaming scenario, we are working with messages using a CSV data format with the following fields:
# Define the schema for the incoming data
turnstiles_schema = StructType([
    StructField("AC", StringType()),
    StructField("UNIT", StringType()),
    StructField("SCP", StringType()),
    StructField("STATION", StringType()),
    StructField("LINENAME", StringType()),
    StructField("DIVISION", StringType()),
    StructField("DATE", StringType()),
    StructField("TIME", StringType()),
    StructField("DESC", StringType()),
    StructField("ENTRIES", IntegerType()),
    StructField("EXITS", IntegerType()),
    StructField("ID", StringType()),
    StructField("TIMESTAMP", StringType())
])
The data format closely resembles what the source system provides for batch integration. However, in this scenario, we also have a unique ID and a TIMESTAMP.
As we process these messages, our objective is to generate files with data aggregation based on these fields:
"AC", "UNIT","SCP","STATION","LINENAME","DIVISION", "DATE", "DESC"
And these measures:
"ENTRIES", "EXITS"
An example of a message would look like this:
"A001,R001,02-00-00,Test-Station,456NQR,BMT,09-23-23,REGULAR,16:54:00,140,153"
It's important to note that the number of commuters is substantial, indicating a certain level of aggregation in these messages. However, they aren't aggregated every four hours, as the batch process does.
Once these message files are aggregated, they are then pushed to the data lake. Subsequently, our data warehouse process can pick them up and proceed with the necessary information processing.
Review the Code
To enable this functionality, we need to develop a Kafka producer and a Spark Kafka consumer, both implemented in Python. Let's begin by examining the fundamental features of the producer:
👉 Clone this repository or copy the files from this folder Streaming
Kafka Producer
The Kafka producer is a Python application designed to generate messages every 10 seconds. The produce_messages function utilizes messages from the provider and sends the serialized data to a Kafka topic.
class KafkaProducer:
    def __init__(self, config_path, topic):
        settings = read_config(config_path)
        self.producer = Producer(settings)
        self.topic = topic
        self.provider = Provider(topic)

    def delivery_report(self, err, msg):
        """
        Reports the success or failure of a message delivery.
        Args:
            err (KafkaError): The error that occurred on None on success.
            msg (Message): The message that was produced or failed.
        """
        if err is not None:
            print(f'Message delivery failed: {err}')
        else:
            print('Record {} produced to {} [{}] at offset {}'.format(msg.key(), msg.topic(), msg.partition(), msg.offset()))


    def produce_messages(self):
        while True:
            # Get the message key and value from the provider
            key, message = self.provider.message()

            try:

                # Produce the message to the Kafka topic
                self.producer.produce(topic = self.topic, key=key_serializer(key),
                                    value=value_serializer(message),
                                    on_delivery = self.delivery_report)

                # Flush to ensure delivery
                self.producer.flush()

                # Print the message
                print(f'Sent message: {message}')

                # Wait for 10 seconds before sending the next message
                time.sleep(10)
            except KeyboardInterrupt:
                pass
                exit(0)
            except KafkaTimeoutError as e:
                print(f"Kafka Timeout {e.__str__()}")
            except Exception as e:
                print(f"Exception while producing record - {key} {message}: {e}")
                continue
This class utilizes the Confluent Kafka library for seamless interaction with Kafka. It encapsulates the logic for producing messages to a Kafka topic, relying on external configurations, message providers, and serialization functions. The produce_messages method is crafted to run continuously until interrupted, while the delivery_report method serves as a callback function, reporting the success or failure of message delivery.
@flow (name="MTA Data Stream flow", description="Data Streaming Flow")
def main_flow(params) -> None:
    """
    Main flow to read and send the messages
    """
    topic = params.topic
    config_path = params.config
    producer = KafkaProducer(config_path, topic)

    producer.produce_messages()

if __name__ == "__main__":

    """main entry point with argument parser"""
    os.system('clear')
    print('publisher running...')
    parser = argparse.ArgumentParser(description='Producer : --topic mta-turnstile --config path-to-config')

    parser.add_argument('--topic', required=True, help='stream topic')
    parser.add_argument('--config', required=True, help='kafka setting')

    args = parser.parse_args()

    # Register the signal handler to handle Ctrl-C
    signal.signal(signal.SIGINT, lambda signal, frame: handle_sigint(signal, frame, producer.producer))

    main_flow(args)

    print('publisher end')
The main block acts as the entry point, featuring an argument parser that captures the topic and Kafka configuration path from the command line. The script then invokes the main_flow function with the provided arguments.
The main_flow function is annotated with @flow and functions as the primary entry point for the flow. This flow configuration enables us to monitor the flow using our Prefect Cloud monitoring system. It takes parameters (topic and config_path) and initializes a Kafka producer using the provided configuration path and topic.
👉 The data generated by this producer uses dummy data. It's important to note that the MTA system lacks a real-time feed for the turnstile data.
Spark - Kafka Consumer
The Spark PySpark application listens to a Kafka topic to retrieve messages. It parses these messages using a predefined schema to define the fields and their types. Since these messages arrive every ten seconds, our goal is to aggregate them within a time-span duration of five minutes. The specific duration can be defined based on solution requirements, and for our purposes, it aligns seamlessly with our current data pipeline flow. The aggregated messages are then serialized into compressed CSV files and loaded into the data lake. Subsequently, the data warehouse incremental process can merge this information into our data warehouse.
Our Spark application comprises the following components:
- Spark Setting class
- Spark Consumer class
- Main Application Entry
- Prefect libraries for flow monitoring
- Prefect component for accessing the data lake
- Access to the data lake
Spark Setting Class
class SparkSettings:
    def __init__(self, config_path: str, topic: str, group_id: str, client_id: str) -> None:
        self.settings = read_config(config_path)

        use_sasl = "sasl.mechanism" in self.settings and self.settings["sasl.mechanism"] is not None

        self.kafka_options = {
            "kafka.bootstrap.servers": self.settings["bootstrap.servers"],
            "subscribe": topic,
            "startingOffsets": "earliest",
            "failOnDataLoss": "false",
            "client.id": client_id,
            "group.id": group_id,
            "auto.offset.reset": "earliest",
            "checkpointLocation": "checkpoint",
            "minPartitions": "2",
            "enable.auto.commit": "false",
            "enable.partition.eof": "true"
        }

        if use_sasl:
            # set the JAAS configuration only when use_sasl is True
            sasl_config = f'org.apache.kafka.common.security.plain.PlainLoginModule required serviceName="kafka" username="{self.settings["sasl.username"]}" password="{self.settings["sasl.password"]}";'

            login_options = {
                "kafka.sasl.mechanisms": self.settings["sasl.mechanism"],
                "kafka.security.protocol": self.settings["security.protocol"],
                "kafka.sasl.username": self.settings["sasl.username"],
                "kafka.sasl.password": self.settings["sasl.password"],
                "kafka.sasl.jaas.config": sasl_config
            }
            # merge the login options with the kafka options
            self.kafka_options = {**self.kafka_options, **login_options}


    def __getitem__(self, key):
        """
            Get the value of a key from the settings dictionary.
        """
        return self.settings[key]

    def set_jass_config(self) -> None:
        """
            Set the JAAS configuration with variables
        """
        jaas_config = (
            "KafkaClient {\n"
            "    org.apache.kafka.common.security.plain.PlainLoginModule required\n"
            f"    username=\"{self['sasl.username']}\"\n"
            f"    password=\"{self['sasl.password']}\";\n"
            "};"
        )

        print('========ENV===========>',jaas_config)
        # Set the JAAS configuration in the environment
        os.environ['KAFKA_OPTS'] = f"java.security.auth.login.config={jaas_config}"
        os.environ['java.security.auth.login.config'] = jaas_config
The Spark Setting class manages the configuration for connecting to a Kafka topic and receiving messages within Spark.
Spark Consumer Class
class SparkConsumer:
    def __init__(self, settings: SparkSettings, topic: str, group_id: str, client_id: str):
        self.settings = settings
        self.topic = topic
        self.group_id = group_id
        self.client_id = client_id
        self.stream = None
        self.data_frame = None
        self.kafka_options = self.settings.kafka_options

    def read_kafka_stream(self, spark: SparkSession) -> None:
        """
        Reads the Kafka Topic.
        Args:
            spark (SparkSession): The spark session object.
        """
        self.stream = spark.readStream.format("kafka").options(**self.kafka_options).load()

    def parse_messages(self, schema) -> DataFrame:
        """
        Parse the messages and use the provided schema to type cast the fields
        """
        stream = self.stream

        assert stream.isStreaming is True, "DataFrame doesn't receive streaming data"

        options =  {'header': 'true', 'sep': ','}
        df = stream.selectExpr("CAST(key AS STRING)", "CAST(value AS STRING)", "timestamp")

        # split attributes to nested array in one Column
        col = F.split(df['value'], ',')

        # expand col to multiple top-level columns
        for idx, field in enumerate(schema):
            df = df.withColumn(field.name, col.getItem(idx).cast(field.dataType))

        # remove quotes from TIMESTAMP column
        df = df.withColumn("TIMESTAMP", F.regexp_replace(F.col("TIMESTAMP"), '"', ''))
        df = df.withColumn("CA", F.regexp_replace(F.col("CA"), '"', ''))

        result = df.select([field.name for field in schema])

        df.dropDuplicates(["ID","STATION","TIMESTAMP"])

        result.printSchema()

        return result

    def agg_messages(self, df: DataFrame,  window_duration: str, window_slide: str) -> DataFrame:
        """
            Window for n minutes aggregations group by by AC, UNIT, STATION, DATE, DESC
        """
       # Ensure TIMESTAMP is in the correct format (timestamp type)
        date_format = "yyyy-MM-dd HH:mm:ss"
        df = df.withColumn("TS", F.to_timestamp("TIMESTAMP", date_format))

        df_windowed = df \
            .withWatermark("TS", window_duration) \
            .groupBy(F.window("TS", window_duration, window_slide),"CA", "UNIT","SCP","STATION","LINENAME","DIVISION", "DATE", "DESC") \
            .agg(
                F.sum("ENTRIES").alias("ENTRIES"),
                F.sum("EXITS").alias("EXITS")
            ).withColumn("START",F.col("window.start")) \
            .withColumn("END", F.col("window.end")) \
            .withColumn("TIME", F.date_format("window.end", "HH:mm:ss")) \
            .drop("window") \
            .select("CA","UNIT","SCP","STATION","LINENAME","DIVISION","DATE","DESC","TIME","START","END","ENTRIES","EXITS")

        df_windowed.printSchema()

        return df_windowed
The Spark consumer class initiates the consumer by loading the Kafka settings, reading from the data stream, parsing the messages, and ultimately aggregating the information using various categorical fields from the data.
The agg_messages function is crafted to perform windowed aggregations on a DataFrame containing message data. It requires three parameters: df (the input DataFrame with message information), window_duration (specifying the duration of each aggregation window in minutes), and window_slide (indicating the sliding interval for the window). The function ensures the 'TIMESTAMP' column is in the correct timestamp format and applies windowed aggregations based on 'AC', 'UNIT', 'STATION', 'DATE', and 'DESC' columns. The resulting DataFrame includes aggregated entries and exits for each window and group, providing insights into activity patterns over specified time intervals. The function also prints the schema of the resulting DataFrame, making it convenient for users to understand the structure of the aggregated data.
👉 The
agg_messagesfunction verifies that the timestamp from the data is in the correct Spark timestamp format. An incorrect format will prevent Spark from aggregating the messages, resulting in empty data files.
Main application entry point
# @task(name="Stream write GCS", description='Write stream file to GCS', log_prints=False)
def stream_write_gcs(local_path: Path, file_name: str) -> None:

    """
        Upload local parquet file to GCS
        Args:
            path: File location
            prefix: the folder location on storage

    """
    block_name = get_block_name()
    prefix = get_prefix()
    gcs_path = f'{prefix}/{file_name}'
    print(f'{block_name} {local_path} {gcs_path}')

    gcs_block = GcsBucket.load(block_name)
    gcs_block.upload_from_path(from_path=local_path, to_path=gcs_path)

    return


# @task (name="MTA Spark Data Stream - Process Mini Batch", description="Write batch to the data lake")
def process_mini_batch(df, batch_id, path):
    """Processes a mini-batch, converts to Pandas, and writes to GCP Storage as CSV.gz."""

     # Check if DataFrame is empty
    if df.count() == 0:
        print(f"DataFrame for batch {batch_id} is empty. Skipping processing.")
        return

    # Convert to Pandas DataFrame
    df_pandas = df.toPandas()

    # Convert 'DATE' column to keep the same date format
    df_pandas['DATE'] = pd.to_datetime(df_pandas['DATE'], format='%m-%d-%y').dt.strftime('%m/%d/%Y')

    print(df_pandas.head())

    # Get the current timestamp
    timestamp = datetime.now()
    # Format the timestamp as needed
    time = timestamp.strftime("%Y%m%d_%H%M%S")

    # Write to Storage as CSV.gz
    file_name = f"batch_{batch_id}_{time}.csv.gz"
    file_path = f"{path}/{file_name}"
    df_pandas.to_csv(file_path, compression="gzip")

    # send to the data lake
    stream_write_gcs(file_path, file_name)

@task (name="MTA Spark Data Stream - Aggregate messages", description="Aggregate the data in time windows")
def aggregate_messages(consumer, df_messages, window_duration, window_slide) -> DataFrame:
    df_windowed = consumer.agg_messages(df_messages, window_duration, window_slide)
    return df_windowed

@task (name="MTA Spark Data Stream - Read data stream", description="Read the data stream")
def read_data_stream(consumer, spark_session) -> None:
    consumer.read_kafka_stream(spark_session)

# write a streaming data frame to storage ./storage
@task (name="MTA Spark Data Stream - Write to Storage", description="Write batch to the data lake")
def write_to_storage(df: DataFrame, output_mode: str = 'append', processing_time: str = '60 seconds') -> None:
    """
        Output stream values to the console
    """
    df_csv = df.select(
        "CA", "UNIT", "SCP", "STATION", "LINENAME", "DIVISION", "DATE", "TIME", "DESC","ENTRIES", "EXITS"
    )

    path = "./storage/"

    folder_path = Path(path)
    if not os.path.exists(folder_path):
        folder_path.mkdir(parents=True, exist_ok=True)

    storage_query = df_csv.writeStream \
        .outputMode(output_mode) \
        .trigger(processingTime=processing_time) \
        .format("csv") \
        .option("header", True) \
        .option("path", path) \
        .option("checkpointLocation", "./checkpoint") \
        .foreachBatch(lambda batch, id: process_mini_batch(batch, id, path)) \
        .option("truncate", False) \
        .start()

    try:
        # Wait for the streaming query to terminate
        storage_query.awaitTermination()
    except KeyboardInterrupt:
        # Handle keyboard interrupt (e.g., Ctrl+C)
        storage_query.stop()

@flow (name="MTA Spark Data Stream flow", description="Data Streaming Flow")
def main_flow(params) -> None:
    """
    main flow to process stream messages with spark
    """
    topic = params.topic
    group_id = params.group
    client_id = params.client
    config_path = params.config

    # define a window for n minutes aggregations group by station
    default_span = '5 minutes'
    window_duration = default_span if params.duration is None else f'{params.duration} minutes'
    window_slide = default_span if params.slide is None else f'{params.slide} minutes'

    # create the consumer settings
    spark_settings = SparkSettings(config_path, topic, group_id, client_id)

    # create the spark consumer
    spark_session = SparkSession.builder \
            .appName("turnstiles-consumer") \
            .config("spark.sql.adaptive.enabled", "false") \
            .getOrCreate()

    spark_session.sparkContext.setLogLevel("WARN")

    # create an instance of the consumer class
    consumer = SparkConsumer(spark_settings, topic, group_id, client_id)

    # set the data frame stream
    read_data_stream(consumer, spark_session)
    # consumer.read_kafka_stream(spark_session)

    # parse the messages
    df_messages = consumer.parse_messages(schema=turnstiles_schema)

    df_windowed = aggregate_messages(consumer, df_messages, window_duration, window_slide)
    # df_windowed = consumer.agg_messages(df_messages, window_duration, window_slide)

    write_to_storage(df=df_windowed, output_mode='append',processing_time=window_duration)

    spark_session.streams.awaitAnyTermination()


if __name__ == "__main__":
    """
        Main entry point for streaming data between kafka and spark
    """
    os.system('clear')
    print('Spark streaming running...')
    parser = argparse.ArgumentParser(description='Producer : --topic mta-turnstile --group spark_group --client app1 --config path-to-config')

    parser.add_argument('--topic', required=True, help='kafka topics')
    parser.add_argument('--group', required=True, help='consumer group')
    parser.add_argument('--client', required=True, help='client id group')
    parser.add_argument('--config', required=True, help='cloud settings')
    parser.add_argument('--duration', required=False, help='window duration for aggregation 5 mins')
    parser.add_argument('--slide', required=False, help='window slide 5 mins')

    args = parser.parse_args()

    main_flow(args)

    print('end')
This is a summary of the main application to start the consumer application:
stream_write_gcs- Purpose: Uploads a local Parquet file to Google Cloud Storage (GCS).
- Prefect Cloud Monitoring: Marked as a Prefect task (
@task) for monitoring.
process_mini_batch- Purpose: Processes a mini-batch from a Spark DataFrame, converts it to a Pandas DataFrame, and writes it to GCP Storage as a compressed CSV file.
- Prefect Cloud Monitoring: Marked as a Prefect task (
@task) for monitoring.
aggregate_messages- Purpose: Aggregates data in time windows based on specific columns.
- Prefect Cloud Monitoring: Marked as a Prefect task (
@task) for monitoring.
read_data_stream- Purpose: Reads the data stream from Kafka.
- Prefect Cloud Monitoring: Marked as a Prefect task (
@task) for monitoring.
write_to_storage- Purpose: Writes a streaming DataFrame to storage (./storage) and triggers the processing of mini-batches.
- Prefect Cloud Monitoring: Marked as a Prefect task (
@task) for monitoring.
main_flow- Purpose: Defines the main flow to process stream messages with Spark.
- Prefect Cloud Monitoring: Marked as a Prefect flow (
@flow) for orchestration and monitoring.
Main Entry Point:
- Purpose: Parses command-line arguments and invokes the
main_flowfunction to execute the streaming data processing.
- Purpose: Parses command-line arguments and invokes the
👉 These decorators (
@flowand@task) are employed for Prefect Cloud Monitoring, orchestration, and task management.
How to runt it!
With all the requirements completed and the code review done, we are ready to run our solution. Let's follow these steps to ensure our apps run properly.
Start the Container Services
Initiate the container services from the command line by executing the following script:
$ bash start_services.sh
Install dependencies and run the apps
👉 These applications depend on the Kafka and Spark services to be running. Ensure to start those services first.
Kafka Producer
Execute the producer with the following command line:
$ bash start_producer.sh
Spark - Kafka Consumer
Execute the Spark consumer from the command line:
$ bash start_consumer.sh
Execution Results
After the producer and consumer are running, the following results should be observed:
Kafka Producer Log
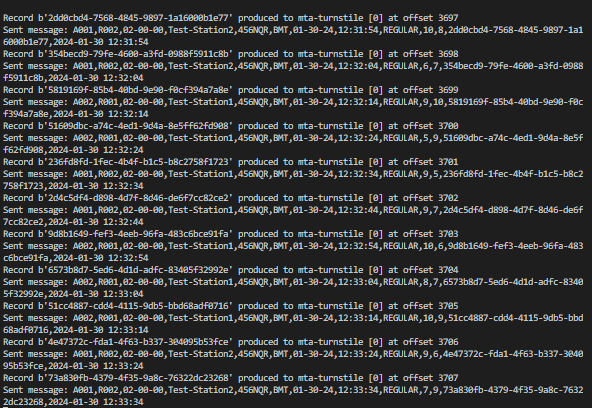
As messages are sent by the producer, we should observe the activity in the console or log file.
Spark Consumer Log
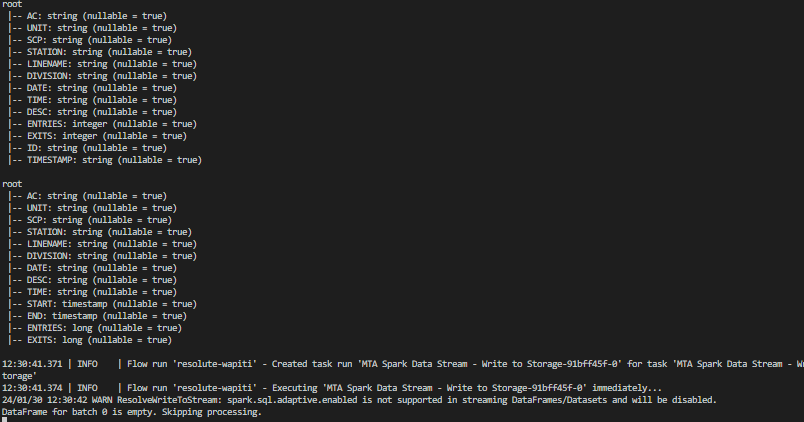
Spark parses the messages in real-time, displaying the message schemas for both the individual message from Kafka and the aggregated message. Once the time window is complete, it serializes the message from memory into a compressed CSV file.
Cloud Monitor
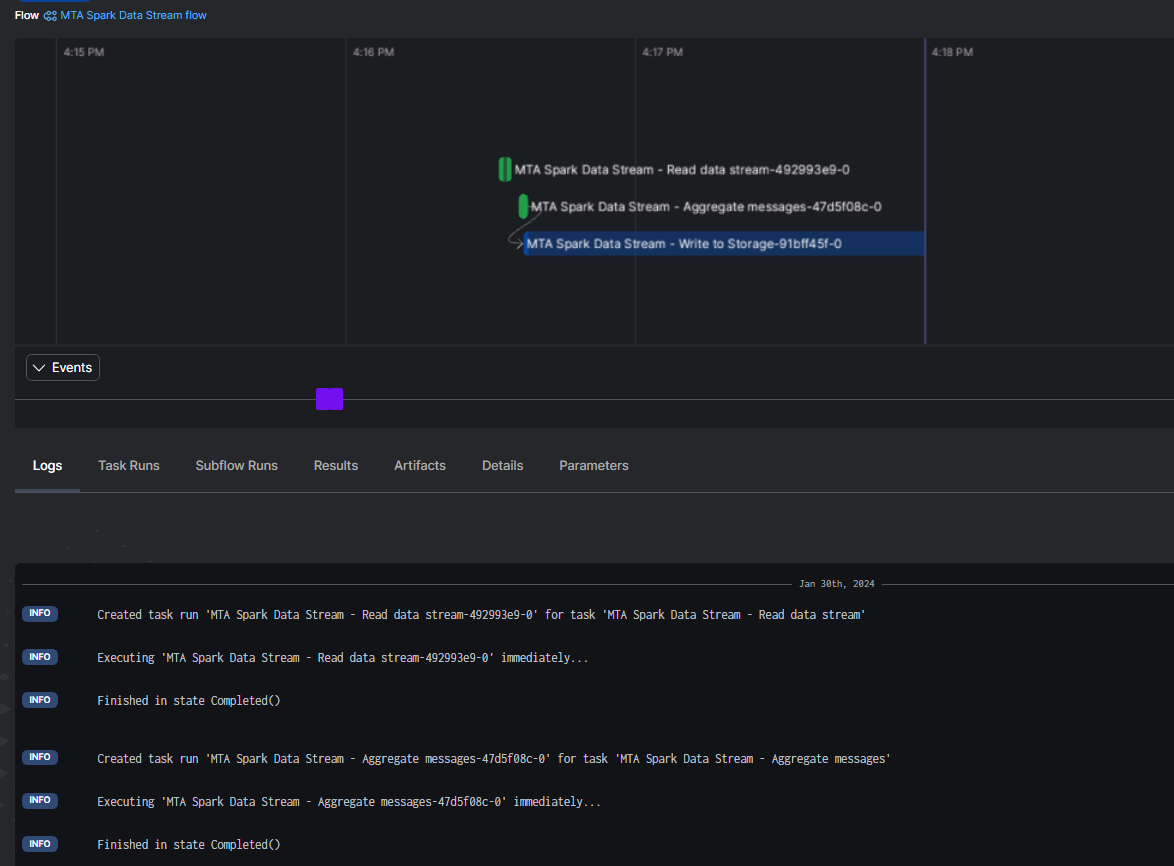
As the application runs, the flows and tasks are tracked on our cloud console. This tracking is utilized to monitor for any failures.
Data Lake Integration

Upon serializing the data aggregation, a compressed CSV file is uploaded to the data lake with the purpose of making it visible to our data warehouse integration process.
Data Warehouse Integration
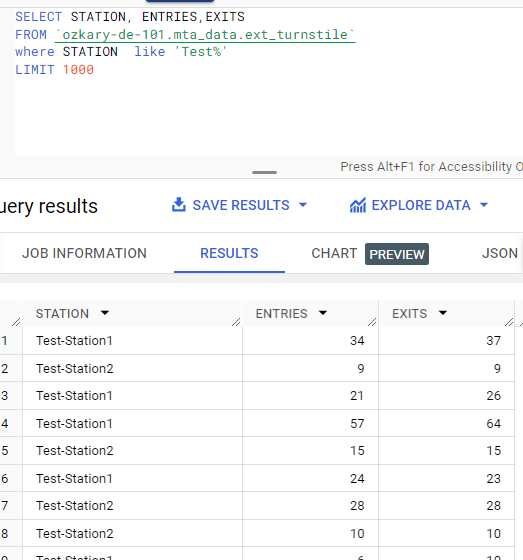
Once the data has been transferred to the data lake, we can initiate the integration from the data warehouse. A quick way to check is to query the external table using the test station name.
👉 Our weekly batch process is scheduled once per week. However, in a data stream use case, where the data arrives more frequently, we need to update the schedule to an hourly or minute window.
Deployment
For our deployment process, we can follow these steps:
- Define the Docker files for each component
- Build and push the apps to DockerHub
- Deploy the Kafka and Spark services
- Deploy the Kafka producer and Spark consumer apps
Define the Docker files for each component
To facilitate each deployment, we aim to run our applications within a Docker container. In each application folder, you'll find a Dockerfile. This file installs the application dependencies, copies the necessary files, and runs the specific command to load the application.
👉 Noteworthy is the use of the
VOLUMEcommand in these files, enabling us to map a VM hosting folder to an image folder. The objective is to share a common configuration file for the containers.
- Kafka Producer Docker file
# Use a base image with Prefect and Python
FROM prefecthq/prefect:2.7.7-python3.9

# Set the working directory
WORKDIR /app

# Copy the requirements file to the working directory
COPY requirements.txt .

# Install dependencies
RUN pip install -r requirements.txt --trusted-host pypi.python.org --no-cache-dir

# Copy the entire current directory into the container
COPY *.py .

# Specify the default command to run when the container starts
CMD ["python3", "program.py", "--topic","mta-turnstile","--config","/config/docker-kafka.properties"]

# Create a directory for Kafka configuration
RUN mkdir -p /config

# Create a volume mount for Kafka configuration
VOLUME ["/config"]

# push the ~/.kafka/docker-kafka.properties to the target machine
# run as to map the volume to the target machine:
# docker run -v ~/.kafka:/config your-image-name
- Spark Consumer Docker file
# Use a base image with Prefect and Python
FROM prefecthq/prefect:2.7.7-python3.9

# Set the working directory
WORKDIR /app

# Copy the requirements file to the working directory
COPY requirements.txt .

# Install dependencies
RUN pip install -r requirements.txt --trusted-host pypi.python.org --no-cache-dir

# Copy the entire current directory into the container
COPY *.py .
COPY *.sh .

# Create a directory for Kafka configuration
RUN mkdir -p /config

# Create a volume mount for Kafka configuration
VOLUME ["/config"]

# Set the entry point script as executable
RUN chmod +x submit-program.sh

# Specify the default command to run when the container starts
CMD ["/bin/bash", "submit-program.sh", "program.py", "/config/docker-kafka.properties"]

# push the ~/.kafka/docker-kafka.properties to the target machine
# run as to map the volume to the target machine:
# docker run -v ~/.kafka:/config your-image-name
Build and push the apps to DockerHub
To build the apps in Docker containers, execute the following script:
$ bash build_push_apps.sh
Deploy the Kafka and Spark services
For Kafka and Spark services, we are utilizing predefined Bitnami images from DockerHub. Deploy these images by running the following script on the target environment:
$ bash deploy_kafka_spark.sh
This script utilizes a Docker Compose file to pull the Bitnami images and subsequently run them.
👉 Docker Compose is a tool for defining and running multi-container Docker applications. It can define the services, networks, and volumes needed for the application in a single docker-compose.yml file.
Deploy the Kafka producer and Spark consumer apps
Once the app images are available from DockerHub, initiate the deployment against a new environment by executing this script:
$ bash deploy_publisher_consumer_apps.sh
This script pulls the app images from DockerHub and runs them independently.
👉 It's important to note that while we've covered a local and a GitHub Action deployment, deploying on a cloud provider environment involves additional considerations.
Deployment Strategy
In this guide, we've explored a two-fold approach to deploying our Kafka and Spark-based data streaming solution. Initially, we used the manual deployment process, demonstrating how to execute bash scripts for building and deploying our application. This hands-on method provides a detailed understanding of the steps involved, giving users complete control over the deployment process.
Moving forward, we showcased a more streamlined and automated approach by integrating GitHub Actions into our workflow. By leveraging GitHub Actions, we can trigger builds and deployments with a simple push to dedicated branches (deploy-bitnami and deploy-apps). This automation not only simplifies the deployment process but also enhances efficiency, ensuring consistency across environments.
Summary
The integration of Kafka and Spark in a data streaming architecture involves producers publishing data to Kafka topics, consumers subscribing to these topics, Spark consuming data from Kafka, parsing and aggregating messages, and finally, writing the processed data to a data lake or other storage for further processing.
Once the data is available in the data lake, the data warehouse process can pick up the new files and continue its incremental update process, ultimately reflecting on the analysis and visualization layer. This architecture enables real-time data processing and analytics in a scalable and fault-tolerant manner.
Thanks for reading.
Send question or comment at Twitter @ozkary
👍 Originally published by ozkary.com


0 comments :
Post a Comment
What do you think?