
A common web application feature is to provide multi-option filter capabilities to data grids. With AngularJS, a common pattern is the use the built-in filter. This however is not available on new versions of Angular due to performance issues. With this article, we take a look at providing the filtering capabilities using Angular 5, Typescript and Reactive Programming with Observables and Behavior subjects.
Defining the model
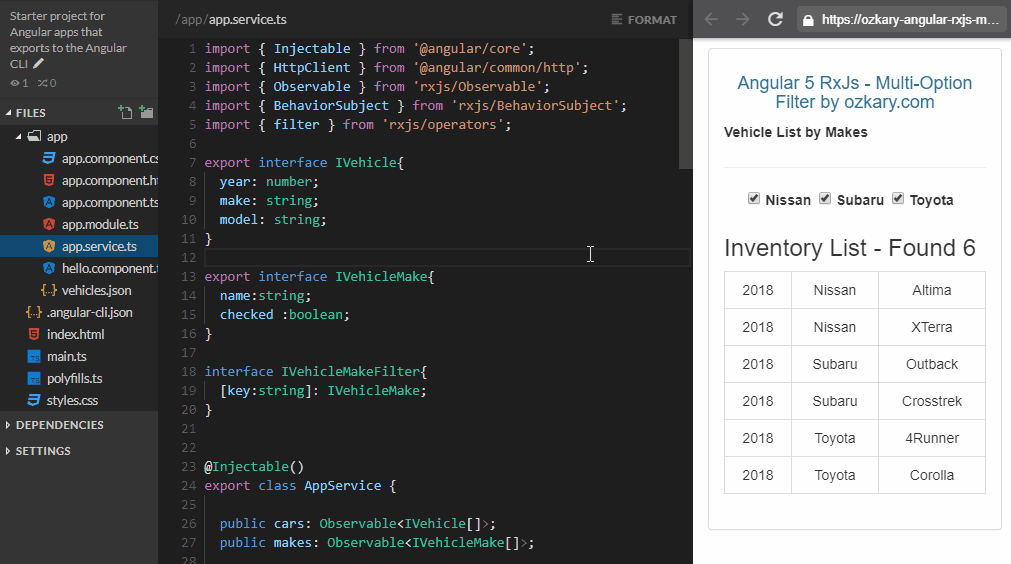
For our demo app, we build a simple vehicle inventory viewer which can filter results by selecting one or more makes (name). As we uncheck an item, the vehicles associated to that selection should not be displayed.
[
{ "id": 1, "year": 2018, "make": "Nissan", "model": "Altima" },
{ "id": 2, "year": 2018, "make": "Nissan", "model": "XTerra" },
{ "id": 3, "year": 2018, "make": "Subaru", "model": "Outback" },
{ "id": 4, "year": 2018, "make": "Subaru", "model": "Crosstrek" },
{ "id": 5, "year": 2018, "make": "Toyota", "model": "4Runner" },
{ "id": 6, "year": 2018, "make": "Toyota", "model": "Corolla" }
];
|
The JSON model is a simple collection of vehicles with four properties. We want to use the make property to filter the vehicle results. In order to do that, we first need define the view models to map the data using Typescript.
Defining the Typescript Interfaces
Typescript enables us to define strong data types with JavaScript. With that in mind, we should first define the interfaces that describe and map the data into objects. Let’s take a look at how that looks:
export interface IVehicle {
year: number;
make: string;
model: string;
}
export interface IVehicleMake {
name: string;
checked: boolean;
}
|
The IVehicle interface describes the raw JSON payload with well-defined data types. The IVehicleMake describes the unique makes that we find from the dataset. The checked property is used to track the selected filter options. We should notice that we want to export these interfaces, so they are available on the components.
We need one more interface which can be used to quickly access the state of the options using constant time O(1) to improve performance for big datasets. We can manage this by defining the interface with the Make name as the key for our lookup to a IVehicleMake reference.
interface IVehicleMakeFilter {
[key: string]: IVehicleMake;
}
|
Now that we have defined the interfaces, we can work on using them by implementing a data service.
Defining the Data Service
We need to define a service that can manage the API integration, data maps and filtering of the data. We want our service to stream the data to our components as the underlying data changes using Observables and Behavior Subject, more on that as we implement the solution. Let’s take a look at our service implementation.
public cars: Observable<IVehicle[]>;
public makes: Observable<IVehicleMake[]>;
private vehiclesSubject: BehaviorSubject<IVehicle[]>;
private makesSubject: BehaviorSubject<IVehicleMake[]>;
private storage: {
vehicles: IVehicle[],
filteredVehicles: IVehicle[];
makes: IVehicleMake[];
filterOptions: IVehicleMakeFilter;
};
constructor(http: HttpClient) {
this.storage = {vehicles:[], filteredVehicles:[], makes:[], filterOptions:{} };
this.vehiclesSubject = <BehaviorSubject<IVehicle[] >> new BehaviorSubject([]);
this.makesSubject = <BehaviorSubject<IVehicleMake[] >> new BehaviorSubject([]);
this.cars = this.vehiclesSubject.asObservable();
this.makes = this.makesSubject.asObservable();
}
|
We declare two public Observable properties which our components can observe for changes. The cars observable tracks the list of filtered vehicles while the makes observable tracks the unique makes that are found on the dataset.
We declared two private BehaviorSubject properties which are used to manage the underlying data changes. The filtered data is projected to the observable properties by calling the asObservable method on the BehaviorSubject object.
*Note: Use BehaviorSubject to store data, modify it frequently and emit to Observers by using asObservable.
Lastly, we add a private storage object which manages the source data, the filtered data, the unique makes and the state of the checked filters. The intend is for the service to manage the data internally and only let the components modify it via the service methods.
Initialize the Service\
public init() {
this.http.get(this.baseUrl)
.subscribe(data => {
this.storage.vehicles = <IVehicle[] > data;
this.storage.filteredVehicles = this.storage.vehicles;
this.storage.vehicles.forEach((item, index) => {
if (!this.storage.filterOptions[item.make]) {
this.storage.filterOptions[item.make] = {name:item.make,checked: true};
this.storage.makes.push(this.storage.filterOptions[item.make]);
};
}); //forEach
let clone = Object.assign({}, this.storage);
this.vehiclesSubject.next(clone.filteredVehicles);
this.makesSubject.next(clone.makes);
},
error => console.log('Could not load vehicles.')
);
}
|
The service init method loads the initial data from an API call. It also sets up the initial state of the storage object with the entire payload. We build the unique makes collection by adding each distinct make in the filterOptions object with the checked property set to true by the default. This enables us to show all the vehicles on first load.
To send the data to the Observable, we are cloning the storage object and projecting that to the Observable properties using the BehaviorSubject next method call.
Filter Method
We finally get to the filter method on our data service. Now that we have our data structures properly defined, the filter operation should be straight forward. Let’s review that next:
public filter(make: IVehicleMake) {
let filterOptions = this.storage.filterOptions;
filterOptions[make.name].checked == make.checked;
this.storage.filteredVehicles = this.storage.vehicles.filter((item, idx, arr) => {
return filterOptions[item.make].checked;
});
let filtered = Object.assign([], this.storage.filteredVehicles);
this.vehiclesSubject.next(filtered);
}
|
The filter method accepts an IVehicleMake parameter. This enables the service to do a look up on the filterOptions object and update the checked property for the filter option. We next filter the vehicles list for only the items where the checked property is true. Notice how we just do a constant time look up by using the key to quickly determine if that item should be displayed.
Component
Our data service is now ready for our component to use by importing the service into the component class as shown next:
import { IVehicle, IVehicleMake, IVehicleMakeFilter, AppService } from './app.service';
export class AppComponent {
cars: Observable<IVehicle[]>;
makes: Observable<IVehicleMake[]>;
found: number;
private svcApp: AppService;
constructor(svc: AppService) {
this.svcApp = svc;
}
ngOnInit() {
this.cars = this.svcApp.cars;
this.makes = this.svcApp.makes;
this.svcApp.init();
this.cars.subscribe(items => this.found = items.length);
}
public filter(ref) {
this.svcApp.filter(ref);
}
}
|
We define the cars and makes properties as Observable of the exported types from our service (IVehicle, IVehicleMake). On the ngOnInit handler, we associate those properties to the service public properties which enable the component to receive the data changes as streams. We then initialize the service to load the data from the API and set the service storage information.
Lastly, we subscribe to the cars observable, so we can get the record count as the data stream changes.
We need to track the checkbox state, so we define a filter method which can be called by the view when a filter option changes. This method uses the service filter method and passes the selected option. This is what filters the view.
Component View
<span class="center-block">
<label *ngFor="let option of makes | async">
<input type="checkbox" [(ngModel)]="option.checked"
(ngModelChange)="filter(option)" />
{{ option.name }}
</label>
</span >
<h3>
Inventory List - Found {{ found }}
</h3>
<table class="table table-bordered text-center">
<tr *ngFor="let item of cars | async" >
<td>{{ item.year }}</td>
<td>{{ item.make }} </td>
<td>{{ item.model }}</td>
</tr>
</table >
|
On the view, we have two main controls. We first create the makes checkboxes which users can use to filter the data. This is bound to the components makes property. The filter action is done by calling the filter method on the ngModelChange event.
We also have a table element in which we render the data from the cars property. There is no explicit filter on this view because the underlying data changes are stream to the component via the service Observables. The async pipe subscribes to the cars observable to show the data that is emitted after the filter events is triggered.
In Action
With this article, we are able to see how to implement a multi-option filter using Typescript and Reactive programming. When comparing to the AngularJS option on the article listed below, we can see there is more complexity on the implementation, but there is much more gain on structure and performance.
Let me know your thoughts and thanks.


0 comments :
Post a Comment
What do you think?