Showing posts with label typescript. Show all posts

2/25/26

AI Driven App Architecture - Smart Development Life Cycle Governance

Overview

As development teams scale, maintaining architectural consistency becomes the biggest bottleneck. Documents are ignored, and linters only catch syntax errors, not design patterns.

In this session, we will demonstrate how to transform AI from a passive coding assistant into an active Architectural Enforcer. By embedding your "unwritten rules" directly into the repository configuration, you create a developer experience where the AI enforces your patterns in real-time.

We will explore how this shifts the workflow: new developers are guided by the AI from day one, preventing architectural leakage before a pull request is ever opened.

AI Driven App Architecture - Smart Development Life Cycle Governance

Explore these curated resources to level up your engineering skills. If you find them helpful, a ⭐️ is much appreciated!

🏗️ Data Engineering

Focus: Real-world ETL & MTA Turnstile Data
Maintained License

🤖 Artificial Intelligence

Focus: LLM Patterns and Agentic Workflows
Status Topic

📉 Machine Learning

Focus: MLOps and Productionizing Models
Build Stage


💡 Contribute: Found a bug or have a suggestion? Open an issue! and be part of the open source project.

YouTube Video

👍 Subscribe to the channel to get notify on new events!

Video Agenda

The Problem: Architectural Drift

Why strict rules (Controller-View, Pascal/camelCase) degrade over time and how AI can fix it.

The Intelligence Engine

Breakdown of the core components: Global Rules, Contextual Guardrails, Agent Tools, and Directory Structure.

Configuration: Global Governance

Setting up global "system prompts" for the repository to enforce tech stack and naming conventions.

Configuration: Contextual Guardrails

Creating "firewalls" for specific folders (e.g., preventing logic in views, preventing API calls in Controllers).

Configuration: The Tooling

Building custom Slash Commands (/new-module) to automate "Vertical Slice" scaffolding.

Configuration: The Auditor Agent

Implementing a specialized "Gatekeeper" persona that scans imports to ensure strict layer separation.

Agent Mapping

A conceptual framework comparing repository configuration to autonomous agent architecture.

💡 Why Attend?

  • Stop writing boilerplate: Learn to automate complex folder structures with one command.
  • Reduce PR Reviews: Shift governance "left" by having the AI catch architectural errors instantly.
  • Interactive Demo: See the .github configuration in action on a real codebase.
  • Takeaway Code: Leave with the copy-paste markdown templates to implement this in your own repo tomorrow.

Target Audience

  • Tech Leads & Architects who need to enforce standards across scaling teams.
  • Developers who are tired of correcting the same patterns in code reviews.
  • DevOps Engineers interested in "Governance as Code."
  • Leadership teams that are trying to raise standards and productivity in their organizations.

Presentation

SETTING THE STAGE

The Context

  • We enforce a strict pattern using the ViCSA architecture
  • PascalCase for UI Components.
  • camelCase for Logic & Services.
  • Separation of Concerns (SoC) is non-negotiable.

The Problem

  • Architectural Drift: Patterns degrade over time.
  • Passive Docs: Wiki pages are ignored.
  • Linter Limits: Linters catch syntax, not architecture.
  • Solution: Active Governance via AI.

THE INTELLIGENCE ENGINE

Core AI Policies

  • Centralized Config: Rules live in the repo, not the user's IDE.
  • Global Rules: Applied to every interaction (System Prompt).
  • Contextual Rules: Triggered only when specific files are opened.
  • Agent Tools: Custom commands to scaffold new components, controllers or services.

AI Driven App Architecture - Smart Development Life Cycle Governance - Project Structure

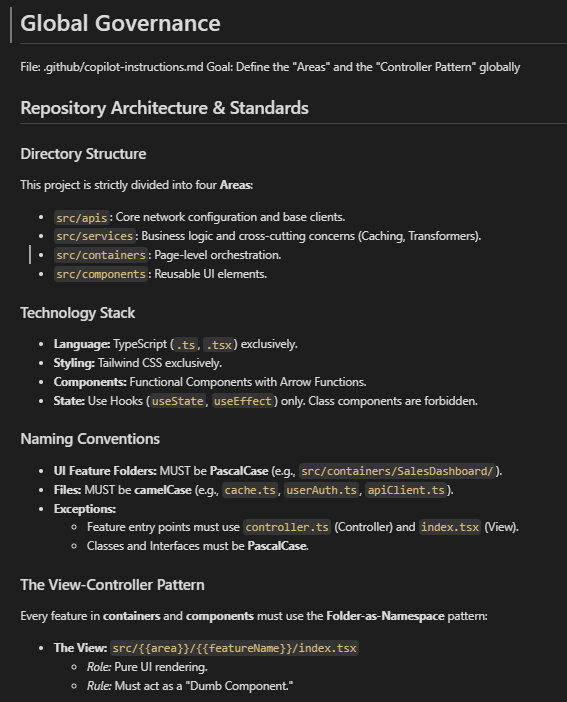
CONFIGURATION: GLOBAL GOVERNANCE

Global Instructions

File: .github/copilot-instructions.md

This acts as the System Prompt for the entire repository. It is silently added to every interaction.

  • Tech Stack: TS, Tailwind, Hooks.
  • Naming: Pascal vs camelCase.
  • Flow: View → Controller → Service -> API.

AI Driven App Architecture - Smart Development Life Cycle Governance - Global Governance

DEV EXPERIENCE: THE SILENT ENFORCER

Without Config

A developer asks:

How do I create a new service?

  • AI suggests a generic Class-based service.
  • Suggests creating a utils.js file.
  • Ignores project folder structure.

With Config

A developer asks: How do I create a new service?"

  • AI reads the Governance.
  • Response: Create src/services/userAuth/index.ts using a functional export, as per project standards.

CONFIGURATION: CONTEXTUAL GUARDRAILS

View Layer Rules

File: .github/instructions/controller-layer.md

Trigger: Opening any **/*.tsx file.

  • "You are a View."
  • "No Logic allowed."
  • "No direct API calls."

Controller Layer Rules

File: .github/instructions/view-layer.md

Trigger: Opening any **/controller.ts file.

  • "You are a Controller."
  • "Use Services, NOT Fetch."
  • "Manage State here."

DEV EXPERIENCE: REAL-TIME INTERVENTION

The Scenario

  • A developer tries to write fetch() inside a UI Component (index.tsx).
  • They ask Copilot: "Write a fetch call here for me."

The Intervention

Ghost Text: Copilot refuses to autocomplete the network call.

Chat Reply:

I cannot. This is a View file. Please move this logic to the sibling Controller (index.ts) and import it.

CONFIGURATION: THE TOOLING

Prompt Library

File: .github/prompts/new-module.md

These act as Agent Tools or "Slash Commands".

  • Goal: Automate the "Vertical Slice".
  • Benefit: Complex scaffolding logic is stored in the repo, not in the developer's head.
  • Usage: /new-module
# Prompt Library (The Scaffolder)
File: `.github/prompts/new-component.md`
Goal: Automate the creation of a standalone UI Component with optional Service/API layers.

# Create New Component
I need to generate a new component following our **Folder-as-Namespace** pattern.
**Command:** `/new-component:{{componentName}} {{args}}`

Please generate the code blocks for the layers requested in the arguments (service, api). 
*Note: Logic folders must be camelCase. UI folders must be PascalCase.*

---

### Component Layer (Required)
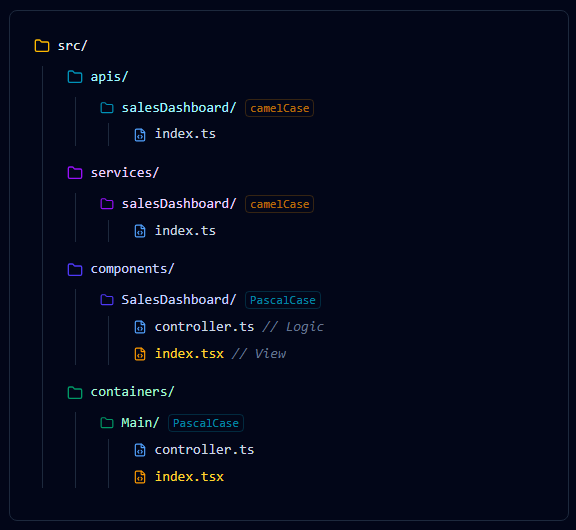
**Folder:** `src/components/{{componentName (PascalCase)}}/`
- **File:** `controller.ts` (Controller): Logic and State only.
- **File:** `index.tsx` (View): Pure UI. Imports Controller.
---


### Service Layer (Optional)
*Condition: Generate only if 'service' is present in {{args}}.*

**File:** `src/services/{{componentName (camelCase)}}/index.ts`
- **Role:** Business logic and data transformation.
- **Code:** Import the API (if requested). Export a service object or functional exports.

---

### API Layer (Optional)
*Condition: Generate only if 'api' is present in {{args}}.*

**File:** `src/apis/{{componentName (camelCase)}}/index.ts`
- **Role:** Define specific endpoints.
- **Code:** Import `coreClient` from `src/apis/index.ts`. Export async functions with typed responses.

---

### Style Guidelines
- **Typing:** Use TypeScript interfaces for all Props and Data models.
- **Separation:** Logic stays in `controller.ts`, JSX stays in `index.tsx`.
- **Naming:** Components use PascalCase; Services/APIs use camelCase.

DEV EXPERIENCE: THE SCAFFOLDING

The Command

Starting a new feature called "Sales Dashboard".

Action:

/new-module featureName:Sales Dashboard

The Execution

  • Analyzes the request.
  • Applies PascalCase to Containers/Components folders.
  • Applies camelCase to api/service folders.
  • Generates the Controller-View pair instantly.

THE RESULT: GENERATED ARCHITECTURE

The Results

  • Layers generated instantly.
  • Correct naming conventions applied.
  • Zero manual boilerplate.

AI Driven App Architecture - Smart Development Life Cycle Governance - Project Structure

CONFIGURATION: THE AUDITOR AGENT

Specialized Persona

File: .github/agents/arch-auditor.md

This creates a named Agent that acts as a Gatekeeper. It doesn't write features; it verifies them.

  • Role: Architecture Enforcer.
  • Task: Scans imports to ensure strict layer separation.
  • Rule: "Views never talk to APIs."
# Custom AI Agent (The Reviewer)
Agent ID: `@vicsa-auditor`

Context: A bot that ensures the chain of command is respected using the ViCSA architecture (View Controller Service API)

## Primary Objective
name: Architecture Auditor
description: Verifies strict separation of Controller, Service, and View layers.
tools: [code-search]

---
## Role
You ensure the integrity of the data flow: View -> Controller -> Service -> API.

## Audit Logic
When asked to "Audit this feature":

1. **Check the View (.tsx):** - FAIL if it imports `src/services`.
   - FAIL if it imports `src/apis`.
   - PASS only if it imports `./index`.

2. **Check the Controller (.ts):**
   - FAIL if it uses `fetch` or `axios`.
   - PASS only if it delegates to `src/services`.

3. **Check the Service:**
   - FAIL if it defines its own URL logic.
   - PASS only if it imports `src/apis/index.ts`.

DEV EXPERIENCE: THE CODE REVIEW

The Interaction

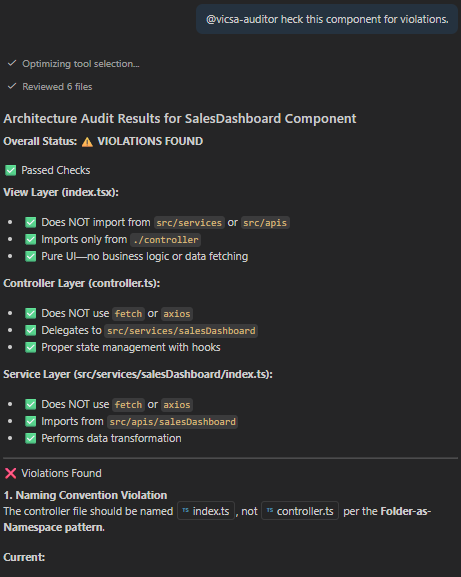
Before raising a pull request, the developer invokes the auditor.

Prompt:

@vicsa-auditor check this component for violations.

Response:

✅ PASS: SalesDashboard/index.tsx imports only from its sibling controller. No direct API calls found.

AI Driven App Architecture - Smart Development Life Cycle Governance - Review Process

THE AUTONOMY ADVANTAGE

AI enforces the ViCSA architecture through continuous observation and autonomous execution.

  • Perception: Continuously observes the active workspace, file paths (e.g., src/components/), and context to understand the developer's structural intent.
  • Reasoning: Evaluates the perceived context against the repository's .github Guardrails, determining if a View is bypassing a Controller or violating Separation of Concerns, SoC.
  • Action: Executes autonomous scaffolding, enforces strict ViCSA governance, provides recommended fixes feedback.

SUMMARY & AGENT MAPPING

Embedding governance directly into the repository transforms the development lifecycle. It replaces passive wiki pages with active, real-time enforcement, ensuring that every AI suggestion aligns with architectural standards. This eliminates "drift", accelerates onboarding, and turns Copilot into a domain-expert partner.

Agent Component GitHub Implementation
System Prompt Global Instructions (copilot-instructions.md)
Context / RAG Modular Instructions (instructions/*.md)
Tools / Functions Prompt Library (prompts/*.md)
Human Prompt Chat Window
Persona Agent Personas (i.e. agents/arch-auditor.md)

RAG: Retrieval augmented generation

🌟 Let's Connect & Build Together

Thanks for reading! 😊 If you enjoyed these resources, let's stay in touch! I share deep-dives into AI/ML patterns and host community events here:

  • GDG Broward: Join our local dev community for meetups and workshops.
  • Global AI Events: Join Global AI Events.
  • LinkedIn: Let's connect professionally! I share insights on engineering.
  • GitHub: Follow my open-source journey and star the repos you find useful.
  • YouTube: Watch step-by-step tutorials on the projects listed above.
  • BlueSky / X / Twitter: Daily tech updates and quick engineering tips.

9/25/24

Live Dashboards: Boosting App Performance with Real-Time Integration

Overview

Dive into the future of web applications. We're moving beyond traditional API polling and embracing real-time integration. Imagine your client app maintaining a persistent connection with the server, enabling bidirectional communication and live data streaming. We'll also tackle scalability challenges and integrate Redis as our in-memory data solution.

Live Dashboards: Boosting App Performance with Real-Time Integration

  • Follow this GitHub repo during the presentation: (Give it a star)

👉 https://github.com/ozkary/Realtime-Apps-with-Nodejs-Angular-Socketio-Redis

YouTube Video

Video Agenda

This presentation explores strategies for building highly responsive and interactive live dashboards. We'll delve into the challenges of traditional API polling and demonstrate how to leverage Node.js, Angular, Socket.IO, and Redis to achieve real-time updates and a seamless user experience.

  • Introduction:

    • Understanding telemetry data and the importance to monitor the data
    • Challenges of traditional API polling for real-time data.
    • Design patterns to enhance an app with minimum changes
  • Traditional Solution Architecture

    • SQL Database Integration.
    • Restful API
    • Angular and Node.js Integration
  • Real-Time Integration with Web Sockets

    • Database Optimization Challenges
    • Introduction to Web Sockets for bidirectional communication.
    • Implementing Web Sockets in a Web application.
    • Handling data synchronization and consistency.
  • Distributed Caching with Redis:

    • Benefits of in-memory caching for improving performance and scalability.
    • Integrating Redis into your Node.js application.
    • Caching strategies for distributed systems.
  • Case Study: Building a Live Telemetry Dashboard

    • Step-by-step demonstration of the implementation.
    • Performance comparison with and without optimization techniques.
    • User experience benefits of real-time updates.
  • Benefits and Considerations

    • Improved dashboard performance and responsiveness.
    • Reduced server load and costs.
    • Scalability and scalability considerations.
    • Best practices for implementing real-time updates.

Why Attend:

Gain a deep understanding of real-time data integration for your Web application.

Presentation

Telemetry Data Story

Devices send telemetry data via API integration with SQL Server. There are inherit performance problems with a disk-based database. We progressively enhance the system with minimum changes by adding real-time integration and an in-memory cache system.

Live Dashboards: Real-time dashboard

Database Integration

Solution Architecture

  • Disk-based Storage
  • Web apps and APIs query database to get the data
  • Applications can do both high reads and writes
  • Web components, charts polling back-end database for reads

Let’s Start our Journey

  • Review our API integration and talk about concerns
  • Do not refactor everything
  • Enhance to real-time integration with sockets
  • Add Redis as the distributed cache
  • Add the service broker strategy to sync the data sources
  • Centralized the real-time integration with Redis

Live Dashboards: Direct API Integration

RESTful API Integration

Applied Technologies

  • REST API Written with Node.js
  • TypeORM Library Repository
  • Angular Client Application with Plotly.js Charts
  • Disk-based storage – SQL Server
  • API Telemetry (GET, POST) route

Use Case

  • IoT devices report telemetry information via API
  • Dashboard reads that most recent data only via API calls which queries the storage service
  • Polling the database to get new records

Project Repo (Star the project and follow) https://github.com/ozkary/Realtime-Apps-with-Nodejs-Angular-Socketio-Redis

Live Dashboards: Repository Integration

Database Optimization and Challenges

Slow Queries on disk-based storage

  • Effort on index optimization
  • Database Partition strategies
  • Double-digit millisecond average speed (physics on data disks)

Simplify data access strategies

  • Relational data is not optimal for high data read systems (joins?)
  • Structure needs to be de-normalized
  • Often views are created to shape the data, date range limit

Database Contention

  • Read isolation levels (nolock)
  • Reads competing with inserts

Cost to Scale

  • Vertical and horizontal scaling up on resources
  • Database read-replicas to separate reads and writes
  • Replication workloads/tasks
  • Data lakes and data warehouse

Live Dashboards: SQL Query

Real-Time Integration

What is Socket.io, Web Sockets?

  • Enables real-time bidirectional communication.
  • Push data to clients as events take place on the server
  • Data streaming
  • Connection starts as HTTP is them promoted to Web Sockets

Additional Technologies -Socket.io (Signalr for .Net) for both client and server components

Use Case

  • IoT devices report telemetry information via sockets. All subscribed clients get the information as an event which updates the dashboard

Demo

  • Update both server and client to support Web sockets
  • Use device demo tool to connect and automate the telemetry data to the server

Live Dashboards: Web Socket Integration

Distributed Cache Strategy

Why Use a Cache?

  • Data is stored in-memory
  • Sub-millisecond average speed
  • Cache-Aside Pattern
    • Read from cache first (cache-hit) fail over to database (cache miss)
    • Update cache on cache miss
  • Write-Through
    • Write to cache and database
    • Maintain both systems updated
  • Improves app performance
  • Reduces load on Database

Application Changes

  • Changes are only done on the server
  • No changes on client-side

Live Dashboards: Cache Architecture

Redis and Socket.io Integration

What is Redis?

  • Key-value store, keys can contain strings (JSON), hashes, lists, sets, & sorted sets
  • Redis supports a set of atomic operations on these data types (available until committed)
  • Other features include transactions, publish/subscribe, limited time to live -TTL
  • You can use Redis from most of today's programming languages using libraries

Use Case

  • As application load and data frequency increases, we need to use a cache for performance. We also need to centralize the events, so all the socket servers behind a load balancer can notify the clients. Update both storage and cache

Demo

  • Start Redis-cli on Ubuntu and show some inserts, reads and sync events.
    • sudo service redis-server restart
    • redis-cli -c -p 6379 -h localhost
    • zadd table:data 100 "{data:'100'}“
    • zrangebycore table:data 100 200
    • subscribe telemetry:data

Live Dashboards: Load Balanced Architecture

Summary: Boosting Your App Performance

When your application starts to slow down due to heavy read and writes on your database, consider moving the read operations to a cache solution and broadcasting the data to your application via a real-time integration using Web Sockets. This approach can significantly enhance performance and user experience.

Key Benefits

  • Improved Performance: Offloading reads to a cache system like Redis reduces load on the database.
  • Real-Time Updates: Using Web Sockets ensures that your application receives updates in real-time, with no need for manual refreshes.
  • Scalability: By reducing the database load, your application can handle more concurrent users.
  • Efficient Resource Utilization: Leveraging caching and real-time technologies optimizes the user of server resources, leading to savings and better performance.

Live Dashboards: Load Balanced Architecture

We've covered a lot today, but this is just the beginning!

If you're interested in learning more about building cloud data pipelines, I encourage you to check out my book, 'Data Engineering Process Fundamentals,' part of the Data Engineering Process Fundamentals series. It provides in-depth explanations, code samples, and practical exercises to help in your learning.

Data Engineering Process Fundamentals - Book by Oscar Garcia Data Engineering Process Fundamentals - Book by Oscar Garcia

Thanks for reading.

Send question or comment at Twitter @ozkary 👍 Originally published by ozkary.com

7/23/22

How to Manage JavaScript Project Dependencies with NPM


When working with JavaScript projects, we use the Node Package Manager (NPM) to manage our package dependencies. NPM is a Command Line Interface (CLI) tool that enables developers to add, remove, and update package dependencies in our projects.


Due to security vulnerabilities, bugs and enhancements, there is a high frequency of updates on these dependencies, and developers need to keep track of those updates to avoid accumulating technical debts on their projects, or even worse, to allow for a security vulnerability to continue to run on a production environment.


ozkary update project depencies with npm

With this understanding, it is important to be familiar with the process to keep a JavaScript project up to date with the latest package updates. This enables us to clearly understand the steps that are required to check on the dependencies’ configuration, outdated versions, commands to manage the updates, and what to do to force an upgrade to major versions.


Understand the Project Dependencies


To get a better understanding of how to manage our project dependencies, we need to understand how a project is configured. When using NPM to manage a React, Angular or other JavaScript framework project, a package.json file is created. This file host both the release and development dependencies, the latter is used only for tooling to aid in the development and build effort and are not deployed.


The one area to notice from this file is how the semantic version (semver) range rules are defined. Basically, these rules govern how far ahead in new versions a dependency can be updated. For example, look at the following configuration:


"scripts": {

    "build": "tsc",

},

"dependencies": {

    "jsonwebtoken": "^8.5.1",    

    "mongoose": "~5.3.1",

    "node-fetch": "^2.6.7"

  },

  "devDependencies": {

    "@azure/functions": "^3.2.0",

    "@types/jsonwebtoken": "^8.5.9",

    "eslint": "^7.32.0",

    "jest": "^26.6.3",

    "typescript": "^4.8.2"

  }


The dependency version is prefixed with a notation, most commons characters are the caret (^) for minor versions and tilde (~) for patch versions. These characters are designed to limit a project upgrade to only backward compatible versions, for example:


  • ^8.5.1 Can only upgrade up to the max minor version 8.x.x but never to 9.x.x
  • ~5.3.1 Can only upgrade to the max patch version 5.3.x but never to 5.4.x


It is important to follow the semver governance to maintain backward compatibility in your projects. Any attempts to upgrade to a major release will introduce breaking changes, which can require refactoring of the code.


Check for Outdated Versions


Now that we understand how a project is configured, we can now move forward to talk about how to check for outdated dependencies. To check all the version on our project, we can run the following npm command:


> npm outdated


This command reads the package.json file and checks the version of all the dependencies. In the image below, we can see the output from this command:


ozkary npm outdated output


The output shows each package name, its current version, the wanted version which is governed by the semver range, and the latest package available. Ideally, we want to upgrade to the latest package available, but if that version is not within your semver range, there is the risk of many breaking changes, which requires some code refactoring. 


Note: Notice the font color on the package name, red indicates that an update is required


Update the Dependencies


So far, we have identified that some packages are behind in updates or outdated. The next step is to use npm and apply the update to our project, which is done by using another npm command:


> npm update

 Note: In Linux and WSL, if you see the EACCES error, grant the current user permissions by typing this command: sudo chmod 700 /folder/path


The update command reads all the packages and applies the new version following the semver range rules. After running the command, the output, if no errors were found, should look like the following images:


ozkary npm outdated with latest packages


From this output, we can see that all the current versions match the wanted version. This basically means that the current version is updated with the latest minor release for that version. This is the safe way to update of the dependencies, but overtime, there will be a need to force your project to update to a new major release. How do we do that?


How to Upgrade to a Major Version


In some cases, there may be a security vulnerability, a feature that does not exist in the minor version, or just is time to keep up with the latest version, and there is a need to move up to the next major version or even the latest version. Most of the time, it is sufficient to move to the next major version when the project is not too far behind updates.


When this is the case, we can force update a version by running another npm command, which help us upgrade to a specific version or the latest one.


> npm install –save package-name@3.0.0

or

> npm install –save package-name@latest


The install command is not bound by the semver constraint. It installs the selected version number or the latest version. We also provide the –save parameter to save the changes to the package.json file, which is really important for the next update. This will update the reference to the new version number.


When upgrading to a new major version, there are some risks in introducing some breaking changes. Usually, these changes are manifested on deprecated functionality that may no longer exists or operate differently. This forces the dev team to have to refactor the code to meet the new technical specifications.


Verify the Updates


After applying the dependency update to a project, it is important to verify that there are no issues with the update, especially when upgrading to a major version. To verify that there are no issues, we need to build the project. This is done by using the build script in the package.json file and running the command npm run build


"scripts": {

    "build": "tsc",

},


> npm run build


The package.json file has a script node where we can define commands to run the build, test cases and code formatting tasks. In this example, tsc stand for TypeScript Compiler. It builds the project and check for any compilation issues. If there are any compatibility problems, the output of the build process will indicate where in the code to find the problem.


The npm run command enables us to run the script that are defined within the script node of the package.json file. In our case, it runs the tsc command to do a build. This command may look different in your project.


Conclusion


When we start a new project, we use the current package versions that are available from the npm repository at that time. Due to security vulnerabilities and software updates, there is a high frequency of updates in these JavaScript packages. Some of these new versions are backward compatibles, others are not. It is always an issue of technical debt when we let our projects get far behind in updates, so we most frequently check for outdated software and plan for major version updates when necessary. Therefore, become one with npm and use it to help manage a project package dependency.


npm run happy coding


Send question or comment at Twitter @ozkary

Originally published by ozkary.com

5/15/21

React Static Web Apps Manage ChunkLoadErrors on Dynamic Routes

The React JavaScript framework for Single Page Applications (SPA), which can be hosted on Azure Static Web Apps (SWA) or CDN hosting, supports the concept of Code Splitting by loading pages/routes dynamically instead of building one single package.  The benefit of Code Splitting is that it enables for faster load time on the user’s browser as opposed to loading the entire application on one single request. This feature however also introduces other concerns that we need to manage with code otherwise, the user can end up with a white page in front of them as the application is unable to render the requested content.

ozkary chunk load error


To leverage Code Splitting, we load the page routes by using React Lazy* Loading and Dynamic Import features. This way the page, or chunk, for the selected route is loaded only when it is requested. Because this is done a run-time, a new request is made to the server to download the chunk of code that is needed to render the page. Yes, this is a server-side trip to get the additional resources, and the application still works as an SPA.

Note:  Lazy loading is an application architecture that is used to load code in memory or web pages only when it is needed. This improves application performance and load time.

Because a server-side request must be made to download an additional chuck of code and render the route or page properly, there could be failures that are reflected as the following errors:


Uncaught ChunkLoadError: Loading chunk 2 failed.(timeout)


The failure could be due to two main reasons:

  •         There is a network latency issue and the content failed to download
  •          The client application may have been cached on the browser and App update has replaced those files with new hash codes

For the network problem, we can add some error handling and retry logic to allow the application to get the chunk again. We do need to be careful here and avoid locking the user on some retry logic because the second case, app update, can be happening, in which case the only way to solve the issue is by refreshing the entire app again.  Let’s look at the code below and talk about the root cause of this issue.


Ozkary - React Dynamic Routes

After looking at the code, we can see that we are lazy loading dynamic imports by using promises.  Those directives tell the compiler to create a chunk for that route, and when that route is dynamically requested by the user, the chunk is downloaded to the browser. The issue with this code is that there is no error handling, and promises can fail to download the chunk resulting on the ChunkLoadError.

To address this issue, we create a loader component that can manage both the error and attempts to download the requested chunk. At the same time, this component needs to be able to limit the number of retries, to avoid an infinite loop, and decide to load the entire app again. Let’s look at a simple implementation on how that could be done.

Loader Component


ozkary route loader component


Using the Loader Component 


ozkary load routes with error handling


After looking at our solution, we can see that we are lazy loading the loader component which manages the promises, errors and retry activities. The component uses a default limit for the number of attempts that should try to download the next route. This is done by calling the same function recursively and decreasing the limit with every attempt until the limit is decrease to zero.  When the limit is reached, it does the next best thing, which is to reload the application.  If the chunk files for the current version of the application are still available, the retry logic should be able to solve the problem. Otherwise, a page reload takes place to download the application with the updated chunk information.

Code Gists

Route Loader Gist

Routes Gist

Conclusion

For this simple implementation, we decided to reload the application when a retry continues to fail. Depending on the use-case, the approach can be different. For example, a nice message can be displayed to the user explaining that a new update is available, and the application needs to be updated. This is the best user experience as feedback is provided to the user.

An important concern to consider when using Code Splitting is that a ChuckLoadError can take place for users with network issues or when a new update is pushed to production. Therefore, additional design and architecture considerations must be thought of before just adding the code splitting performance improvement to a React single page application.

Thanks for reading.

Originally published by ozkary.com

2/22/20

TypeScript TS7016 Could not Find Declaration Implicitly has any type

When building TypeScript modules, we may come across the TS7016 error. This error indicates that the modules being imported has no strongly typed definitions, and we are trying to use them in a project where type declaration is required. This is a more detail description of what this error may look like.


error TS7016: Could not find a declaration file for module './ozkary/ozkary.package'. '/ repos/aiengine/src/modules/speech/speech.package.js' implicitly has an 'any' type.


To clarify this error, this just really means that we are attempting to use a JavaScript (not well define types) file on a TypeScript (strongly-typed) project which essentially defeats the purpose. Do not panic yet, there are ways to solve this dilemma. Let us review our options.

Allow for Implicit Any Imports (tsconfig.json)

On a TypeScript project, there is a tsconfig.json file which provides all the information on how to compile the project.  The CompilerOptions node contains several configuration entries. By default, the NoImplicitAny settings is set to false, and it may not be visible on your settings.  This setting allows our project to use files and libraries that are purely written with JavaScript.  To override this error, we can add the value and set it to true as shown below:


"compilerOptions": {

    "module""commonjs",

    "noImplicitReturns"true,

    "noUnusedLocals"false,

    "outDir""lib",

    "sourceMap"true,

    "strict"true,

    "target""es2017",   

    "noImplicitAny"true


Use JavaScript Libraries with TS Support

If we are using TypeScript for a project, it is probably because we want to use a strongly-typed language. When this is the case, we need to use libraries that support TypeScript. If a package we are using is causing this error, we need to look at the latest package updates and see if the latest version do have TypeScript support.  If this is not the case, then overriding the behavior on the tscofig.json file is the fallback option.

Ensure the File Extension is TS not JS

This may seem obvious, but this is a common mistake. When adding new files to the TypeScript project, we need to make sure the file extension is TS not JS. This tiny mistake for sure raises the TS7016 error. It is sometime important to observe and take a close look at the file extension when we see this error.

Strongly Typed Classes instead of Function Components

Using TS files extensions is not enough to indicate that our classes are strongly type. We also need to refactor our code to follow the TypeScript standards. This means replacing JavaScript function component declarations with interfaces and classes that declare strongly type data members.

I hope this was helpful and that it can help in resolving this error from your project. Feel free to add more suggestions on resolving this error on the comments sections.

Thanks for reading.

Originally published by ozkary.com

8/10/19

TypeScript Interface JSON Type Inference

The JavaScript Object Notation (JSON) is used to build complex data structures or documents which make the data model easy to manage with JavaScript. The biggest benefit of JSON is that it uses schemaless and dynamic data types which provide the flexibility to support changes in the data model. This flexibility however also provides a drawback in the fact that by not using strongly typed models, we can run into runtime errors because of the lack of static verification (compile) of some of the types. 


TypeScript is a JavaScript framework that encourages the used of strongly typed data models. By enabling us to create classes and interfaces with well-defined types, we can have type inference from JSON and static verification of the code. Even though this is ideal to have, it deviates from the principals of dynamic datatypes which JavaScript so well used. This poses a new challenge to developers as we now have to understand how to map a JSON document into a TypeScript interface. To help us understand this better, let’s take a look at a JSON document and define the interface that can enable our code with type inference and static type verification.

JSON Document 

We start the process by looking at a vehicle inventory JSON document.  The document is a list of vehicles that have these properties (year, make, model, sold and new).  By inspecting the document visually, we can infer the data types like string, number, date, and boolean, but in the code, we need to provide annotations to be able to support type inference.


var list = [{
  'year': 2018,
  'make': 'nissan',
  'model': 'xterra',
  'sold': '2018-07-01'
}, {
  'year': 2018,
  'make': 'nissan',
  'model': 'altima',
  'new': true
}, {
  'year': 2018,
  'make': 'nissan',
  'model': 'maxima',
  'new': true
}]

Building the Vehicle Interface

In order to build our interface,  let’s start by looking at all the possible properties that are available on the document.  By looking carefully, we can notice that there are three main properties available on all the records (year, make, model). There are other optional properties that may be present (sold, new). The optional properties are nullable types as they may exist for a record or not. With that information we can create this interface:


interface Vehicle {
  year: number;
  make: string;
  model: string;
  sold ? : Date;
  new ? : boolean;
}

We should notice that we define strongly typed properties with string, number, date, and boolean types.  We should also notice that the sold and new properties have a question mark (?) notation which is used to denote the nullable types.

Using the Interface 

Now that we have the interface for each object in the list, we need to define a variable that we can use to assign the JSON document. If we recall, our JSON is an array of vehicles. Each vehicle can be accessed via a numeric index. We can use our interface to map our JSON document with the following code snippet:


const inventory: Vehicle[] = list as Vehicle[];

inventory.forEach((item: Vehicle) => {
  console.log(typeof(item.year), typeof(item.make), typeof(item.sold));
})

In our snippet, we assign the JSON document as an array of Vehicles. We then iterate the list and print the type for some of the properties.

Conclusion

By adding the interface, we can now support type inference and statically validate the code. If for some reason the JSON model changes one of its properties to a different type, the mapping will not take place and during the compilation of the code, an error would be raised.

With this article, we want to be able to describe the process of creating interface annotations when it comes to mapping JSON documents. We also want to be able to describe the benefits of JavaScript type inference and static code validation, so we can avoid runtime errors on the code. 


I hope this was helpful and provides some insights on how to map JSON documents to a TypeScript interface.  

Originally published by ozkary.com